Showing posts with label Pasta. Show all posts

Tuesday, April 26, 2016

SPAGHETTI WITH PISTACHIOS, PANCETTA, ROSEMARY


Spring is here! I know I should be happy for the gorgeous weather, the young new leaves, and the litters of kittens and puppies being born everywhere (adopt!), but I’m really a Fall person at heart, in love with its decadence and melancholy and with me not sweating like a menopausal marmot trapped inside a mosquitoes-infested clambake. Also, Fall means my kids will be in school… What can I say? Spring and its mad energy never really did it for me. The only way to mitigate the annoyance of my spring rut is , unsurprisingly, spring food.

Today’s recipe is a very simple pasta that my Sicilian grandma used to make: spaghetti with pistachios, pancetta, and rosemary. And before you get too excited (I know you are—that combination does sound fantastic), I have to disclose that I’ve been researching this recipe, and it doesn’t seem to have any history or claim to tradition. It’s just something my grandma picked up somewhere in the 90s (perhaps even from a woman’s mag) and presented to us grandchildren to a thundering applause.

This pasta dish is very easy and quick to make, and packs a lot of flavor with the use of fresh rosemary. Also, it’s nice and oily and has a great crunch, which makes it a really fun dish to serve to family and friends.


Now, you might wonder what exactly makes this a spring pasta, since all ingredients can be found all year long. Well, pistachios and rosemary are green, right? And pancetta cubes look like little rosebuds just about to bloom. And frankly, just let it go. NOT in the best mood here.


And since we're making pasta, let's refresh our basic pasta skills:


SPAGHETTI WITH PISTACHIOS, PANCETTA, ROSEMARY

Makes 4 portions
  1. 1 tbsp EVOO
  1. 1 small onion, finely chopped
  1. 2/3 C cubed pancetta
  1. 1/4 C dried shelled pistachios
  1. 1 rosemary sprig
  1. 10 oz spaghetti
  1. salt & pepper to taste
Instructions
  • Start making the pasta in a large pot like I explained before (see links in post).
  • While the water is heating up, heat the EVOO in a frying pan.
  • Add the onion and the pancetta and cook at medium-low heat until the pancetta is crispy, and the onion is soft and golden, 5 to 7 minutes.
  • Once the pasta in the pot: In a food processor, coarsely grind the pistachios and the leaves from the rosemary leaves. You should aim for a medium grind.
  • Drain the pasta, and stir in the two mixes until pasta is well coated.
  • Add fresh ground black pepper to taste

  1. .

Thursday, October 1, 2015

KEEP IT SIMPLE: PASTA WITH SMOKED BELL PEPPERS

Pasta with smoked bell peppers.

What I love the most about Italian cuisine is its simplicity. There are so many fantastic dishes that rely on just a handful of ingredients... Which means you really have no excuse for not cooking good food even for the quickest and loneliest of home lunches. Of course, when you're working within the parameters of simplicity, your ingredients need to be top-notch. But even if you can't count on the best, slow-dried pasta or the freshest Neapolitan mozzarella or the sweetest ripe cherry tomatoes from Campania, just focusing on moderately good ingredients can yield something truly delicious. This is a long way of saying, have fun with your Italian cooking but don't use egg noodles and broken-up Velveeta slices for pasta cacio e pepe.

One dish I like to make in the warmer months is pasta with roasted bell peppers. In the past, I would roast my peppers directly on the gas stove, charring the skin until it would to peel off easily. You might be acquainted with this technique: The "gas burner" method is the quickest and easiest way to have perfectly cooked bell pepper fillets for your pasta (or bruschetta, or sandwich, or vegan side dish, or whatever).

A year ago, however, Mr Bee and I were experimenting with roasting whole eggplants on the stove by wrapping them in aluminum foil, and we were delighted to discover that the eggplant would come out with a great smokey flavor (perfect for baba ganoush). So, we thought, why not try with bell peppers? Thank you, insatiable human curiosity! The peppers tasted amazing, as if we had just pulled them out of the smoker. And since it was time for lunch, we chopped the peppers up, sautéed them with a little chopped onion, and served them on pasta. Perfect, mega-flavorful, super-easy, four-ingredient (vegan!) dish.

This pasta is so easy and rewarding in itself, it really doesn't need any extras. However, if you are one of those people who likes bolder flavors, you can add cheese (Parmigiano, Pecorino, ricotta salata, or fresh mozzarella), salt-cured olives, capers, or fresh basil. But, really, you don't need anything fancy. This can be the simplest of lunches, with just a touch of private celebration.

Pasta with smoked bell peppers.
OK, so we added some cheese to this one.

PASTA WITH SMOKED BELL PEPPERS


2–3 bell peppers (any color except green)
2 tbsp EVOO
1 smallish onion, chopped
salt
10 oz good-quality pasta (any format will do with the exception of egg pasta and thin, long pasta)
  • Wash the peppers and wrap them tightly in two sheets of aluminum.
  • Place each pepper on a gas burner, and roast for 15–20 minutes, turning every few minutes or so with metal tongs to make sure the peppers are cooked all over. Bell peppers are ready when they feel soft when prodded.
  • Once the peppers are ready, let them cool down and then peel off the charred skin. 
  • Cut the peppers into fillets and then chop them in smaller pieces.
  • Heat the extra-virgin olive oil in a large frying pan.
  • Add the chopped onion and cook until soft and browned.
  • Add the bell peppers and a pinch of salt and cook for another 5–8 minutes to blend the flavors.
  • Cook the pasta al dente in the appropriate pot.
  • Drain the pasta, add it to the pan, and cook for another minute or so.
  • Serve immediately, and drizzle with more extra-virgin olive oil if preferred (I prefer).
And since we're making pasta, let's refresh our basic pasta skills:


Wednesday, July 22, 2015

11 ESSENTIAL ITALIAN KITCHEN TOOLS


What are the essential tools that would make your kitchen truly Italian? After months and months of pondering, I'm ready to present you with my final list. It is based mostly on my personal experience as an expat, especially from the first year in Mr Bee's house, where I would search every drawer and cabinet for these little gems before calling my family in tears. Here they are, in all their indispensable glory.

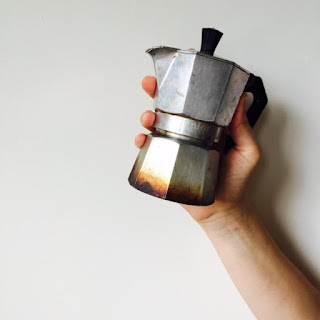
1. MOKA POT

Moka pot


In Italian, la caffettiera. This beautiful, beautiful object appears in many formats in every single Italian household. The moka pot is the best and quickest way to have a strong coffee (just a little less concentrated than regular espresso) any time of the day, and especially in the morning. Just fill the bottom half with water, insert the portafilter, add espresso-grind coffee, and screw on the top half. Place on the stove, and you'll have your coffee in minutes. And, unlike an espresso machine, a moka pot is completely portable and requires minimal maintenance—just rinse in hot water after each use. In my opinion and that of many others, Bialetti makes the best.


2. GAS COOKER TRIVET

Gas cooker support for moka pot
Add caption


In Italian, la crocetta. This is a godsend if you're using a smaller moka pot on a gas cooker. It's a support to keep the moka pot in place on larger gas burners. It usually starts out much shinier than the one in the picture, which is by now well oxidated.


3. FINE CHEESE GRATER

Cheese server for Parmigiano


In Italian, la grattugia. If you need to grate Parmigiano or Pecorino for your pasta—and it's completely acceptable to do it right at the table before you eat—you need this. The small holes and the rounded surface allows you to grate the cheese in fine and soft ribbons, so that it starts melting immediately on your dish in all its salty and creamy goodness. The large-holed cheese grater that you use to shred cheese is not popular in Italy, where I believe it's only used for vegetables. I use this small grater from Ikea, but in Italy people use a larger one.


4. CHEESE SERVER


In Italian, la formaggiera. When you're not grating cheese straight on your plate, you can use a cheese server, great for formal dinners but definitely used everyday on the traditional Italian table. It needs to be filled with fresh Parmigiano, and people pass it along and sprinkle one or two teaspoons of cheese on their pasta. When I was younger, my grandparents would ask me to grate a small mountain of cheese on a plate and then pour it in the server in time for lunch. This one is from Alessi.


5. CRUMB SWEEPER


In Italian, il raccoglibriciole. In my opinion, nothing else encapsulates Italy more than this plastic brush designed to clean up your tablecloth from breadcrumbs after a meal. The popularity of this object means two things: that Italians like to eat at a table covered with proper tablecloth, and that they are going to have bread with whatever they're eating. After over ten years in the United States, I wonder whether Italians are keeping up with their social eating and bread dependency. I really hope so.


6. PASTA MACHINE

Pasta or pastry cutter

In Italian, la macchina per la pasta. I'm positive that Italians today do not make homemade pasta as often as their grandparents. However, this is a beautiful object that everybody who loves cooking should have. There are few things more satisfying than cranking your pasta machine on a floured table (and now that I have fresh pasta on my mind, I can't really think of any). Mine is a gorgeous red Imperia. Ask for one for you birthday.


7. PASTA CUTTER


In Italian, la rotella. If you own a pasta machine, then you cannot forgo the pasta cutter. It's perfect to cut ravioli, and of course you can also use it as pastry cutter for all your pies and quiches. Mine belonged to my maternal grandmother, and it's light, sturdy, and precise. I also love the sweet rattling sound it makes as it cuts through the dough. So satisfying.


8. DOUBLE-HANDLE MEZZALUNA


potato ricer

In Italian, mezzaluna ("half moon"). I was genuinely surprised that this was not a staple of American kitchens, too. It's perfect to chop herbs and nuts. Just rock it side to side, occasionally sweeping everything back to center for another round of chopping. You can object that a knife would be quicker, but that's true only if you have good knife skills (I don't). Plus, you'd be really missing out on all the fun, and I can't condone that.


9. RICER


In Italian, lo schiacciapatate. This is basically a gigantic garlic press for vegetables, and especially potatoes, that gives you the creamiest, fluffiest ribbons of potato you can ever dream of. Use a ricer to make puré, the (slightly) lighter and more elegant version of mashed potatoes, but also potato gnocchi, and my favorite fancy ice-cream creation: spaghetti ice cream.


10. CITRUS SQUEEZER


soup plate, use in Italy for the first course

In Italian, lo spremiagrumi. In winter, mothers all over Italy spend the best part of their day squeezing juicy Sicilian oranges for their little ones, because you know, vitamin C. And let me tell you, you really get to respect your mother when you see her exerting tremendous force on a tiny squeezer to obtain even the last drop of orange for your morning breakfast. Small and easy to clean, it's an Italian must-have.


11. SOUP PLATES


In Italian, i piatti fondi. Don't be fooled by their English name, the piatto fondo is not only for soups. Rather, it is the plate where the first course, or primo, is served. On a classic Italian table, you eat your pasta, soup, or rice dish on the soup plate, and then your second course on a dinner plate. I was dumbfounded when I came to the United States and discovered you only use dinner plates for pasta. The soup plate is the perfect vessel so that your primo feels neither too crudely exposed nor too infantilized. (Makes sense, right?) Luckily, my MIL gifted me a set of 6 soup plates so I can feel a little better when I get a little homesick and make myself a megaportion of ravioli.

Wednesday, May 13, 2015

HAPPY PASTA (PUT AN EGG ON IT)


In the past years, there have been few things that made me happier than the rehabilitation of the egg as a health food. It is really up there with the comeback of leggings and the birth of my children. Really, I love eggs. I love them in all their gastronomic incarnations and for their simple beauty (please check my humble Pinterest homage, "The Egg Came First"). In fact, I'm pretty sure my elder days will see me as an Italian-American version of Edith Massey's Egg Lady, juggling hard-boiled eggs in the air and dishing out frittatas left and right. You've been warned.

You can only imagine how I felt when I found the recipe for "pasta with a fried egg" in a tome of ancient traditional Italian recipes that a friend gave me when I moved to the United States. The dish is from Calabria, the region of bold and spicy flavors, and is so simple and genius I could not believe I had spent thirty years of my life without it.

So, what's pasta with a fried egg about? Well, it is simply good-quality spaghetti tossed with extra-virgin olive oil, red pepper flakes, and pecorino, and then topped with a fried egg. Once the dish is presented to you in all its sunny cheerfulness, you just break the egg with a fork and release the runny yolk for your personal, instant mini-carbonara.


The first time I made it for myself and Mr Bee, we became almost giddy with joy. This spicy, hearty pasta was flavorful and creamy, and probably one the best examples of old-Italy comfort food. Also, for someone as lazy and perennially late as I am, I could not get over about how easy it was to make.

Now to the important stuff. For a dish this simple, the pasta needs to be good quality, which means it needs to have flavor on its own and be able to keep "al dente" (many low-quality pasta turn to glue a minute after you take them out of the pot). For the past few years, I've been using Trader Joe's organic spaghetti, but they've recently changed brand, and I still need to test it. I think De Cecco pasta should work, and you definitely can use hardier long pasta like Venetian bigoli or bucatini. In a pinch, and for a healthy accent, I like to use Trader Joe's whole-wheat pasta, which has surprising great bite and taste. I know that's not traditional, but we're not purists here: We just have standards, right? One last piece of advice: I would not use egg pasta; as much as I love eggs, that would be redundant.

So let's celebrate the good weather we're having and the decreasing pollen count with a simple, quick, cheap, and happy pasta that is as fun to serve as it is to eat. And for the hearts of stone out there, how can you resist that yolk's adorable stare? DIG IN.


PASTA WITH A FRIED EGG


Makes 4 portions

10 oz spaghetti (good quality)
1/2 C grated Pecorino
1 whole dried red pepper, crushed, or 3/4 teaspoon red pepper flakes (or whatever you feel comfortable with)
3 tbsp EVOO + more of drizzle on pasta
4 eggs (preferably pasteurized)


  • Cook the spaghetti al dente in a large pot of salted water.
  • While the spaghetti cook, fry the eggs in the EVOO until the whites are firm, and the yolks are still runny.
  • Drain or scoop the pasta out of the water (you want it to retain some of the water to better bind with the other ingredient) and place in a bowl. Stir in the Pecorino, the red pepper, and some more EVOO to taste.
  • Divide the pasta on the plates, and top each with a fried egg.
  • Sit down to eat, chop the egg coarsely with your fork so that the yolk runs all over your pasta, and enjoy.

And since we're making pasta, let's refresh our basic pasta skills:


Tuesday, April 14, 2015

NOT TOO LATE: MALLOREDDUS WITH LAMB RAGÙ

Malloreddus with lamb ragù, a Sardinian pasta

One of the main differences between Dead Chef and a serious food blog is that the serious food blogs publishe holiday recipes on time, so that readers have all the time to make up their minds on their menu, buy the necessary supplies, and even attempt a recipe once before the big day. So it is with a little shame that I present you with my Easter recipe a full two weeks after Easter. The recipe is Malloreddus with Lamb Ragù, which should lessen the shame quite a bit since it's a pretty damn delicious.

So, Easter. I love lamb: so soft, so flavorful, so fat. It was one of the main reasons that Mr Bee and I spent our honeymoon in Sardinia, the beautiful Italian island that is heaven on earth and that perfected the use of lamb in cooking to an art. Among the million amazing dishes we tried on our 6-day trip (we ate in our sleep, too), there was a simple pasta with a lamb ragù that captured our hearts and possibly initiated their clogging. The pasta was malloreddus, a traditional small "dumpling" you can find in specialty stores or at conventional grocery stores under the name of "gnocchetti".

The main focus of the recipe, however, is the lamb ragù. I based my recipe on the Florentine ragù preached by Giuliano Bugialli in his precious tome The Fine Art of Italian Cooking (incidentally, a great culinary history book, too). I made Bugialli's ragù many times with beef, veal and pork, and even turkey (surprisingly flavorful), and it always comes out extremely well: rich, earthy, velvety, and abundant. I believe the secret lies in the use of dried porcini mushrooms to impart a robust, earthy vigor to any sauce. You might want to find some good-quality dried porcini for this; I get mine straight from Italy.

Once you have your lamb ragù, you just mix it with the cooked pasta and serve the dish drizzled in good extra-virgin olive oil and topped with grated Pecorino. It's a super-flavorful pasta with the pomp of a winter recipe and the simplicity of a last-minute spring lunch. Perfect for Easter, then, or right afterwards.

Malloreddus with lamb ragù, a Sardinian pasta


MALLOREDDUS WITH LAMB RAGÙ

FOR THE RAGÙ

4–5 large pieces of dried porcini mushrooms 
3 tbsp EVOO + more to top off pasta in the end
1 onion, minced
1 carrot, minced
1 celery rib, minced
1 garlic clove, crushed
1 tbs tomato paste
1 lb ground lamb
1/2 C red wine
salt and pepper to taste
1 lb canned tomatoes (preferably San Marzano)
1 1/2 C vegetable stock

1 lb malloreddus (or Barilla "gnocchetti")
3–4 tbsp grated Pecorino, preferably Sardinian


  • Soak the mushrooms in a cup filled with warm water for at least 20 minutes.
  • Make the soffritto: Heat the EVOO in a large pot (I use a Dutch oven), and then add the garlic, onion, carrot, and celery and let cook at a low heat until soft and a little caramelized. You might want to splash some water here and there if the soffritto ever gets dry.
  • Add the tomato paste and cook for 2 minutes.
  • Turn the heat to medium, and mix in the ground lamb. Sauté for 15 minutes, then spoon off most of the fat. Unless you want to keep it, of course. I'm not judging. *tips hat*
  • Add the red wine and cook until evaporated, for another 10–15 minutes.
  • While the wine cooks down, pureé the tomatoes with an electric blender.
  • Once the wine is cooked down, add salt and pepper to taste and mix in the tomatoes.
  • Lower the heat and cook for 25 minutes.
  • Remove the porcini mushrooms from the water, give them a good squeeze, chop them, and add them to the sauce.
  • Strain the water from the dried mushroom through paper towels or a fine sieve to remove any grit.
  • Add the mushroom water and vegetable stock to the ragù and cook for another 1 1/2 hours.
  • Cook the pasta in abundant, salted water, then strain and mix with the ragù in a large bowl.
  • Drizzle the pasta with EVOO and top with grated Pecorino.

Note: If you really cannot find malloreddus, you can use other types of short pasta like conchiglie, orecchiette, elbows... Do not go as small as orzo, though, or it will turn into a sad slop of a dish. 

Another note: The original recipe was for a beef ragù, but I made it with veal and pork and even with turkey, and it always turned out great. And at this point, you can use it for anything you want,  from pasta to lasagne to chili to the Sloppy Joe of you life. 


And since we're making pasta, let's refresh our basic pasta skills:


Thursday, January 8, 2015

ITALIAN BACHELOR'S PASTA (WITH CANNED TUNA)

Farfalle pasta with canned tuna in oil

I don't know how many self-professed "bachelors" are among the readers of this blog, but I'll dedicate this post to them nonetheless. Any of you reading this might know one and send him this recipe to help him through his day. The recipe is for Tuna Pasta, a dish that is mostly, if not exclusively, consumed by Italian bachelors. You might wonder, "Is this pasta going to turn me into one of those suave Italian hunks the whole world cannot take its eyes from?" No, sorry. Those suave Italians à la Marcello Mastroianni, with their impossibly well-fitting suits, their smart and distant gaze, their pitch-perfect flirting skills, and their irresistibly magnetic charm do not cook. They only eat at nice restaurants or cozy trattorie, or they pay a visit to their loving mothers for some exceptional traditional fare. The bachelor I'm talking about is of the familiar dork variety: the one that buys monochrome socks in bulk (I'm not judging, I do the same) and are more than happy to spend their evenings in front of the TV eating the easiest/comfiest meal possible.

The original recipe is very simple. You overcook half a box of short pasta (short pasta requires less water, hence a smaller pan, hence easier dishwashing) and then you plop the contents of a whole can of tuna on top of it. Stir hastily and serve eat.

I have consumed the original tuna pasta in biblical quantities in my life, especially in the years during which my sister and I were living with our divorced dad, who did all the cooking. I remember one glorious 2-week streak of interrupted tuna pasta that finally broke me and helped me decide that I should really learn to cook. So I guess without tuna pasta, there would be no Dead Chef, and what a sad, cold world would that be.

The recipe I want to give you today is an improvement on the basic recipe. It's still simple, but demands the use of a pan to give the tuna some extra flavor. It's comfort food, but with a little more self-respect (let's not kid ourselves, it's delicious!). And sometimes, that's all it takes. Enjoy.

Detail of farfalle pasta with canned tuna and oregano

TUNA PASTA

Makes 2 hefty portions *wink*

1 tbsp EVOO
1–2 anchovies
1 crushed garlic clove
A can of canned tuna in olive oil (like Genova)
1 tbsp dried oregano
Half a box of pasta (spaghetti are best, but short pasta will do)

  • In a large pan, heat the EVOO and then add the anchovies and garlic. Stir the anchovies until they've melted completely. Discard the garlic when it starts to brown.
  • Drain the tuna and then plop it in the pan. Break it with a wooden spoon, trying to keep some larger chunks intact. The oil may splatter at this point; cover with a splatter screen for a few minutes.
  • Cook, stirring occasionally for a few minutes, or until the tuna bits get a little crispy. Add the oregano.
  • Once the pasta is cooked, stir it in the pan with the tuna, add a splash of EVOO and serve.

And since we're making pasta, let's refresh our basic pasta skills:


Wednesday, November 19, 2014

PUMPKIN RAVIOLI (MADE WITH CHESTNUT FLOUR)

Image of plated chestnut-flour pumpkin ravioli.
  
Here I am with a recipe that has been wiggling in my brain for months: pumpkin ravioli made with chestnut flour. I LOVE chestnut flour. I bought it for the first time a few years ago from The Italian Store, and I've used a few times to make linguine and crepes with great success. Chestnut flour has a mellow, sweet, nutty flavor that is subtle and unexpected. It produces a pasta dough that is tougher than the usual dough for egg pasta, but it also cooks very well and maintains a good bite, so it's worth every extra pound of pressure you need to apply to your rolling pin and pasta maker.

The pumpkin/chestnut idea became suddenly urgent when last month, on a whim, I bought a peanut pumpkin that a DeadChef follower and cooking expert later defined as "the MOST delicious pumpkin ever for pies and everything else". This is the kind of comment that gets me really excited, of course. Unfortunately, days passed and I couldn't get to my ravioli thanks (really, THANK YOU) to a string of unforeseen, disheartening sh*t, including Microbee (the youngest) getting sick and throwing the entire family into a weeklong nightmare of tears, snot, insomnia, and recrimination. When I finally judged myself ready for my peanut pumpkin, I realized with great horror that it had rotted from the inside and was completely inedible. To make things worse, my farmer's market was not selling them anymore. Which brings me to my new motto:

Image of motto, "Good things rot for those who wait".

I had to give up on the best pumpkin in the world, but I wasn't giving up on my ravioli vision.
So I immediately drove back to my farmer's market and purchased another pumpkin. This time, I chose a Long Island Cheese Pumpkin, because if I couldn't have the best, then I wanted another with a similarly evocative name. The Cheese Pumpkin didn't disappoint—well, it did disappoint in not tasting like actual cheese, but I knew the name was due to its shape—it is a more velvety and sweet version of a butternut squash, and decidedly more delicious. 

While the pumpkin was roasting in the oven, I worked on the chestnut-flour pasta dough, and then rolled it out, stretched it, filled it, and cut it despite the slightly unnerving attentions of my very defiant and mechanically-obsessed Minibee (the oldest).
Step-by-step ravioli making. Image of thinly-rolled pasta dough, dough with bits of filling, hands pressing dough on filling, hand using pasta cutter to shape ravioli.
The pasta cutter in the last pic belonged to my maternal grandma. It's my amulet.

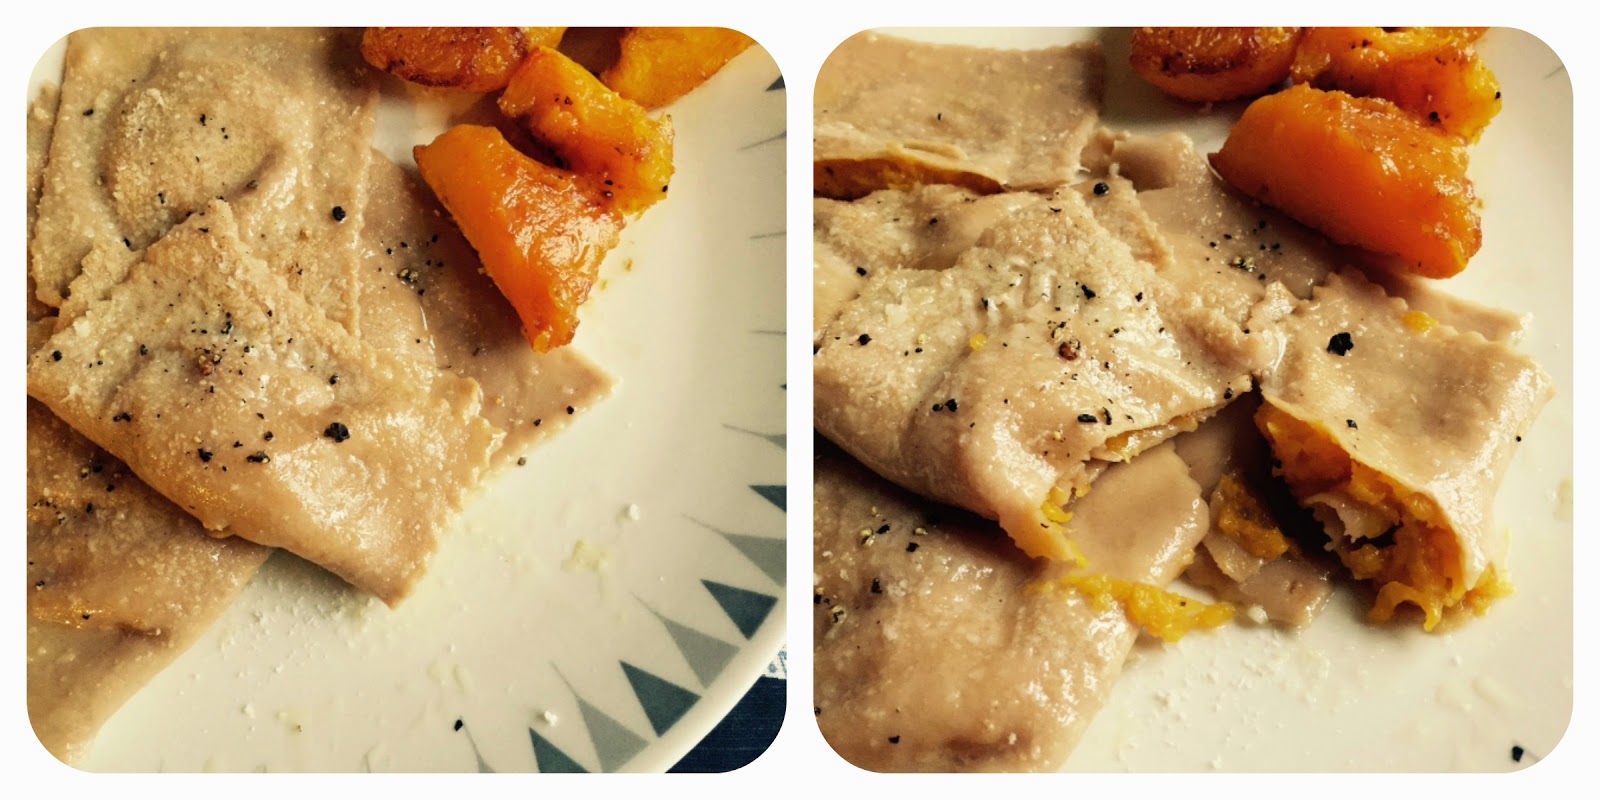
I'm happy to report, the final ravioli were a total delight, sweet and creamy and absolutely perfect for fall. We served them topped with melted butter, grated Parmigiano, and a little black pepper, and added some leftover cheese pumpkin cubes aside. It took a whole afternoon with the constant sabotaging by my kids, but when there's a pot of buttery ravioli at the end of the parenting tunnel, nothing can stop me.

Two close-up of chestnut pumpkin ravioli. Second image shows open ravioli with filling oozing out.

PUMPKIN RAVIOLI 

(MADE WITH CHESTNUT FLOUR)


for the filling:

2C roasted pumpkin (with EVOO and kosher salt)
1/2C grated Parmigiano Reggiano
freshly ground black pepper

for the pasta:
1C chestnut flour

1C unbleached all-purpose flour
a pinch of salt
1 tbsp EVOO
2 eggs
1 egg white (for sealing the ravioli)

finish:
2 tbsp unsalted butter
1/4C grated Parmigiano
freshly ground black pepper

MAKE THE FILLING
  • Peel and cut your pumpkin in small pieces. Drizzle with oil, sprinkle with salt and roast in a 375F oven until fork tender. Let cool.
  • Mash the pumpkin with a potato masher if you like to keep some of the original texture (and heartiness), otherwise, puree until smooth in a food processor. 
  • Stir in the Parmigiano and the pepper.

MAKE THE PASTA DOUGH
  • Mix the two flours in a bowl and stir in the salt and EVOO.
  • Add the two eggs and mix first with a fork and then, when the dough starts to come together, with your hands, until you obtain a compact, elastic dough that is not sticky. If the dough is still dry and crumbly, sprinkle with water until you reach the desired consistency.
  • Cover and let rest of 30 minutes.

MAKE THE RAVIOLI
  • Roll out the dough with a rolling pin or with a pasta machine until very thin. If you never used a pasta machine before but want to start now, check out these instructions.
  • My ravioli were 3X3'', because I wanted to have a little filling in the center and some room for the pasta itself to breathe (you get to enjoy the chestnut flavor more). If you want the same, cut the pasta in 3'' wide strips and place a heaping teaspoon of filling every 3''.
  • Brush with egg white (mixed with a couple tablespoons of water) along the edges and in between the filling heaps.
  • Place another strip of pasta on top and cut the edges of each piece with a pasta cutter.
  • Place the finished ravioli on a floured kitchen towel and sprinkle with flour.

COOK&SERVE
  • Melt butter in a nonstick pan.
  • Cook the ravioli in gently boiling water for 2–3 minutes. Be delicate: they are.
  • Serve the ravioli, about 5 per portion, topped with melted butter, black pepper, and Parmigiano.

Monday, October 13, 2014

PASTA WITH FRIED ZUCCHINI (AND THE GARLIC RULE)


I woke up this morning and was shocked to see it's October and not August. Where did late summer go? Halloween decor has been gracing the shelves of my CVS since July 5th, so perhaps I've trained my brain to screen out all references to Fall. But I know whom to blame for my confusion: My CSA is still offering zucchini and squash, so I'm still in summer mode. You'll have to scalpel away the Haflinger cork sandals from my dead, tan feet. (Sorry, this is a horrible image.)

Today I present you with a classic Sicilian recipe that my grandmother and mother prepared many times for my sister and I when we were little girls. The main ingredient is zucchini, thinly sliced and fried until golden brown and then spooned over spaghetti and topped with grated cheese. The sweet juices from the zucchini are going to give your spaghetti a nice brown color once you mix all the ingredients, which is something I remember perfectly from my childhood.

Standing in front of a frying pan for 20 minutes, carefully turning over zucchini slices is not my ideal approach to summer heat, so maybe it's really better if we make this pasta in October, when the air is nice and cool and our sunny past is just behind us.

Fried zucchini
Fried zucchini at rest.

THE GARLIC RULE

And here's the Garlic Rule you've been waiting for since reading this post's title. As you will see in the recipe below, the garlic is just crushed, added to the hot oil until golden, AND THEN DISCARDED. This is key concept in Italian cooking that people used to Italian-American cooking might not realize. Italians love garlic and use it often, but they like it mostly in moderation, as a small pungent accent. Heaps of minced garlic are NOT a thing in Italian cuisine. By frying the garlic for a minute, you basically infuse the oil with garlic flavor and perfume and you don't turn it into a branding tool to stamp the word "garlic" on your entire meal.

Eat me.

SPAGHETTI WITH FRIED ZUCCHINI

4 medium zucchini
2 garlic cloves, crushed 
1/4 C EVOO (or enough to fry the zucchini)
1 lb spaghetti
1/4 C grated pecorino or Parmigiano Reggiano
Salt
Pepper


  • Cut the zucchini in 1/4'' disks and set up a large pot with water for the spaghetti.
  • Heat the olive oil in a large frying pan.
  • Cook the garlic cloves in the hot oil for one minute, or until golden. Then discard.
  • Place the zucchini disks in one layer in the pan and fry on both sides, a few minutes per side, until golden brown. You might need to fry the zucchini in batches.
  • Remove the zucchini and place them on a plate covered with paper towels to drain the excess oil.
  • Cook the spaghetti al dente. You might want to use the technique for pasta with uncooked sauce outlined here.
  • Mix the spaghetti in a large bowl with the zucchini, the cheese, and some freshly-ground black pepper.
  • Serve immediately.

And since we're making spaghetti, let's refresh our basic pasta skills:


Thursday, March 20, 2014

MY ITALIAN PANTRY: KIRKLAND PESTO


Pesto is one of those godsend products that can solve any meal with minimal effort. Just slap it on pasta or other grain/starch products (farro and quinoa especially), add it to a bland soup, serve it on potatoes, or mix it in a frittata, and you'll have a perfectly delicious dish that tastes fresh, luscious, and complex.

Of course, it all depends on the quality on the pesto. If you are a proud inhabitant of Liguria, where pesto is from, you can just make it fresh whenever you want, and it will taste better than any other pesto forever and ever. If you are not from Liguria but are still a better person than most, you can pound together basil, Parmigiano, pecorino, pine nuts, extra-virgin olive oil and garlic with a pestle and mortar right in time for lunch and still have time to look down your nose on the rest of the world. However, if you are anything like me, you're more than happy to buy some ready-made pesto to keep in the fridge to use when you feel lazy, but not lazy enough to eat cold leftovers from last month's brunch with friends.

"100% Imported Italian Basil D.O.P." and other ingredients. Wait...


So let me make my first product recommendation in this blog, starting with a pesto that is not painfully expensive and that tastes pretty damn Italian. I'm talking about Kirkland Basil Pesto sold at Costco in 22-oz jars for $9.40. The ingredient list is pretty good for commercial pesto, with Genovese basil, extra-virgin olive oil, Parmigiano, and pine nuts in the mix. Yes, there is sunflower oil and other strange stuff, but I have to confess that most commercial pesto in Italy uses plenty of shortcuts, replacing extra-virgin olive oil with safflower oil, pine nuts with walnuts or cashews, and adding extra weirdness such as powdered milk, margarine, palm oil, and dehydrated potatoes.

I've had a few guests from Italy in recent months, and they all loved the pesto and its price. One guest went back home with a jar, and another, daughter of a true Genovese, asked me to buy it again for the next time she'll come visit. The jar is pretty huge, so you might want to try to freeze it in cubes so you can make sure you use it all. As for my family, we go through 22 oz. quickly and without any problems. It's the overwhelmed-work-at-home mother's best friend.


Tuesday, September 3, 2013

SPAGHETTI AND MEATBALLS ("FREEBIRD!")

Ever since I moved to the United States, I am regularly confronted with the strangest assumptions about my Italian lifestyle. Everything from my male friends wearing wife-beaters and pinching women's butts on public transportation, to my mother being a widow in a black shawl (my parents are divorced and alive, thank you very much), to the omnipresence of tomatoes in my diet, to the impossibly dramatic discussions I have with my fellow citizens on a daily basis. These stereotypes might be somewhat offensive, and they seem to describe a twisted vision of 1940s Italy spiced with a pinch of operetta, but I have to admit they do contain some truth. I think the American equivalent would be the ranch-owning Texas cowboy doling out dollar bills left and right. There must be someone like that in the state of Texas, but it hardly describes Americans in general. 


Well, this week I made Spaghetti & Meatballs. "Of corse you did!," some of you might say, "That's what Italians eat, right?" Actually, no. Spaghetti & Meatballs is an Italian-American classic mostly unknown to Italians. In fact, I belong to the minuscule minority of Italians who actually ate this pasta in their youth, thanks to my Sicilian grandmother who made it for me ONCE. I think I remember my grandmother telling me that pasta with meatballs originated in Sicily, but I'm not sure. Most websites I checked believe the recipe is completely Italian-American.


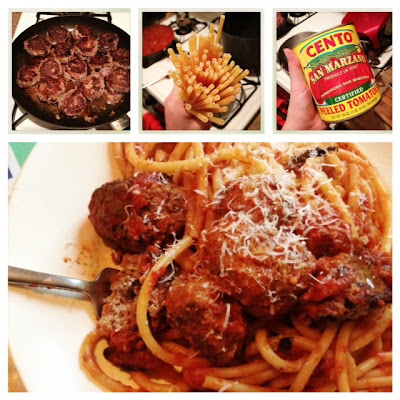
Spaghetti with meatballs, bucatini with meatballs
Trust me: This pasta should never be photographed in sepia tone.

Did I like it? Yes, of course. I love pasta al ragù as much as any other Italian, so Spaghetti & Meatballs represents a perfectly acceptable combination to me. Still, as I was cooking, I could not help but wonder whether I was committing a form of self-stereotyping. I've seen Italians play up their accent and dramatize their gestures to be accepted or, more cynically, to sell Italian goods. I have also been guilty of the occasional act of self-stereotyping, and just last week I got a chuckle out of some American moms when I told them I don't jog because I'm Italian and I like to take things leisurely. It was a cheap laugh, and I still feel horrible about it.

In the end, I'm not sure what this Spaghetti & Meatballs stirred in my Italian conscience. Maybe I was self-stereotyping in the give-them-what-they-want spirit. Or maybe I was just recognizing something strangely familiar in this rich, tomatoey triumph. After all, this pasta and I are both Italian, separated by an ocean and possibly a couple of centuries. And, like long lost relatives, we may not have much to say to each other, but we will always share a table, and be pretty content about it. That's the way we've both been raised, you know?


Dead Chef's Bucatini & Meatballs


So here is my recipe. It's a hack of the Italian-American classic that brings together my favorite pasta format—the lovely, thick bucatini—and my family's very Southern meatballs, usually served on their own as a second course. I kept the recipe simple, but you can definitely work on a more complex tomato sauce with a soffritto and a splash of white wine, especially if you are not using San Marzano tomatoes. 

1 lb ground beef, or a mix of ground beef, veal, and pork 
4–5 slices of fresh mortadella, tore by hand into small bits* (optional)
1/4 cup chopped black cured olives (or Sicilian olives, if you can find them)
A few sprigs of chives, chopped
1/3 cup grated Parmigiano Reggiano
1 whole egg
dry breadcrumbs (unflavored)
3 tbsp extra-virgin olive oil
1 can of San Marzano tomatoes, chopped in the food processor
1 lb bucatini

  • Mix the first 6 ingredients in a big bowl and shape into small meatballs. My grandmother's would be about 1'' in diameter, but do what you prefer. Roll the meatballs in the breadcrumbs.
  • Heat the olive oil in a large saucepan and add the meatballs. Cook them on all sides until brown, then add the tomatoes. Gently simmer, uncovered, for 30-45 minutes, or until the meatballs are cooked through.
  • While the meatballs are cooking, cook the bucatini in a large pot (see Dead Chef's technique here.) 
  • When the bucatini are ready, remove the meatballs from the sauce and place them in a large dish. Sauté the bucatini in the tomato sauce and the necessary pasta water. When the pasta is perfectly al dente and infused with tomato sauce, top with the meatballs, a little bit of olive oil and grated parmesan, and serve.


*Do not ever replace with Bologna. Not only Mortadella and Bologna are not the same thing, but Bologna is not even food.


Monday, August 5, 2013

Perfect Pasta: Dead Chef's Technique

As promised, here's my almost-magic technique for cooking perfect pasta... so perfect you can serve it to your Italian guests without fear of silent judgement or, God forbid, tears.

I personally* developed this technique over 10 years ago, and it has made such a difference in the pasta I eat at home it's almost ludicrous. The pasta ends up perfectly cooked and absorbs the sauce's flavor in a way that does not happen through simple sautéing. Plus, you get a slight creaminess that just makes the whole dish look and taste almost professional. I'm boasting, I know. But I'm also drooling, so you know I'm sincere.

First things first: If you haven't, read this post to learn about the correct amount of pasta, water, and salt for your recipe: American Pasta: 11 Ways You're Doing It Wrong. You have to know the basics, right? Done? LET'S DO IT!

Note: The recipe here is simple whole-wheat penne** with tomatoes, black cured olives, and mozzarella. What you'll see is two Italian portions, enough for a quick lunch for me and my 2-year-old.


DEAD CHEF'S TECHNIQUE FOR PERFECT PASTA


1. Cook or reheat your sauce in a large pan while the water is boiling or the pasta is cooking, depending on how long it takes.

2. Boil the pasta in salted water (really, salt it!), and taste it 12 min before it's supposed to be ready. When you see the "soul" of the pasta (or the tiny white ringlet of uncooked-ness), move to the next step.


3. Pour one full ladle of cooking water into a cup and set aside.


4. Drain the pasta and pour it in the pan with the sauce, stir, and keep cooking at medium heat.


5. Add a splash (I'd say a few tablespoons) of the reserved pasta water and stir gently until the water has been absorbed.


6. Keeping adding water to the pasta and letting it absorb until the pasta is perfectly cooked and still al dente. You don't have to use the whole cup, and in my experience 2–3 rounds will do. How do you know it's ready? TASTE IT.

RESULT: Here is the finished pasta. I added some mozzarella at the very end so it would stay firm and not melt into a single squeaky block. Notice the pasta's color: you can see it has absorbed the juices from the olive oil, the tomatoes, and the black olives.


N.A.Q. (Never Asked Questions)


Gratuitous close-up.
I don't have a list of F.A.Q. because I just published this, but I know what you all might wonder...

WHAT DOES THIS DO? I have no scientific insight on the matter, but I think the salt and starch in the cooking water allows the pasta to absorb the sauce better. What I do know, is that the starch in the water will thicken into a creamy sheen that will prevent your pasta from drying out. 


I FORGOT TO RESERVE THE PASTA WATER. CAN I USE HOT WATER OR BROTH? No, I tried and they don't work. They simply dilute the flavor and the broth also alters it too much. Finally, neither created the creaminess I obtained with the pasta water. (Please note that whole-wheat pasta will be less creamy, but not less flavorful.)


IS THIS THE RISOTTO-STYLE TECHNIQUE FOR PASTA I READ ABOUT? No, because in that case the pasta is cooked from the beginning by adding liquid gradually as you would with risotto. I tried the technique and it's great, but in my opinion it takes too long, and the pasta ends up being a little too starchy (if you need a more professional opinion, then please know that Mark Ladner, executive chef of Del Posto restaurant in NY, said the same in the 2013 Winter issue of Lucky Peach.)


WON'T I RUIN THE SAUCE BY BASICALLY BOILING IT? This is an excellent question. Well played, my friend! Runnier sauces like marinara will be fine, but if you're cooking seafood or vegetables that should retain some "crunch", then yes, adding water and prolonging the cooking might ruin everything. In that case, put the condiment in another plate and let just enough juices in the pan to follow the process. Stir everything back together once the pasta is ready.


YEAH, BUT WHAT IF I'M USING PESTO? Thank you for paying attention, you culinary hawk! For all your recipes with an uncooked sauce, like pesto, you sauté the pasta in extra-virgin olive oil (13 tbsp depending on quantity) and add the pasta water little by little as explained above. When the pasta is cooked, transfer it to a warm bowl, add the sauce, stir, and serve. I found this oil-and-water technique in a cookbook by Allan Bay, unfortunately published only in Italian (by Feltrinelli). 


So, are you ready to try this? Let me know how it goes! 


*OK, I'm sure I'm not the only one who came up with this. If you cook pasta like this, please share!!!

**I get my whole-what pasta from Trader Joe's. It's organic, it's cheaper than many other supermarket brands, and it does a great job at staying al dente. Plus, it tastes like pasta, not like gritty cardboard, which I appreciate.


Monday, July 22, 2013

American Pasta: 11 Ways You're Doing It Wrong

Nine years ago I moved from Italy to the United States into a very gastronomically-conscious community, so I'll say from the start that I've had some good pastas here, especially from my friends of Italian-American descent.

I have, however, also witnessed and then consumed some proper atrocities. Pastas so overcooked, tasteless, and weird that they have become staple horror stories for my family and friends back home. This might sound mean, but let me assure you: It's not. Everybody is judgmental about how their traditions are carried out and interpreted, and since as Italians our only sense of pride these days is food, we're going to get pretty resentful and emotional about it.

In the future I will write a full post on how to prepare a perfect pasta that would please an actual Italian, but for the moment, check out these common mistakes and learn to avoid them:

1. KNOW YOUR PORTIONS. Italians do not eat a shovelful of pasta per meal. We eat about 2-3 oz depending on hunger level and/or occasion. Mega portions are frowned upon, unless you're a particularly active adolescent or a pregnant woman like myself (in that case, shovel over and suspend judgement). You don't care and want to eat more? Fine, but adjust water and salt accordingly, as explained below.

2. START WITH THE RIGHT AMOUNT OF WATER. Purists will ask for a quart of water per portion. I find that you can definitely get away with less, especially if you're preparing an unpretentious home meal. However, there needs to be enough water to cover the pasta comfortably. Spaghetti might stick out for the first minute or so, but then they should swim happily in the water. So, a sauté pan might work to boil 2 portions of penne, but you still want a taller pot for spaghetti and other kinds of long pasta.

3. YOU NEED WAY MORE SALT THAN THAT. Pasta water needs to be salty. You cannot just add a pinch of salt to a stock pot--that's completely useless. The rule of thumb is about one teaspoon per person, or for 2-3 oz of pasta. This will make pasta flavorful in itself and allow it to absorb more of the sauce once you get everything in the pan. Oh, you can add the salt once the water is boiling. Definitely add it BEFORE you put the pasta in.

4. WAIT FOR THE WATER TO BOIL BEFORE ADDING THE PASTA. That's it.

5. STIR, NOW! Stir the pasta for about 30 seconds, less if it's not very crowded. This will prevent the pasta from sticking. Some people suggest adding some oil to the water, but that is based on a myth.

6. TIME IT, BUT TASTE IT, TOO. You want to read the cooking time of the pasta format you have chosen, but really, you should taste it, too. The amount of water, the size of your pot, how crowded the pasta is... these are all variables that can slow down the cooking time. Try the pasta a couple of minutes before it supposed to be ready. If you see the "soul", or a tiny white speck or ringlet inside the pasta, that means it should be ready in a minute. If there's no soul in your pasta, then drain it. No matter what, though, do not let the pasta cook for much longer. Good-quality pasta can tolerate a couple of extra minutes in the water, but cheap pasta will become a gluey mess.

7. DON'T LET IT DRAIN FOR HOURS. This I saw multiple times. The pasta is drained on the sink and then left there, in the colander, for a painfully long amount of time. If you want to shock an Italian, this is definitely the way. Pasta should be drained and then immediately mixed with the chosen condiment, in a bowl or back in the hot pan. If you let it sit, it will get cold, it will stick, it will become an inedible glue. It will suck beyond belief, and the damage will be pretty much irreparable. You might add a little bit of oil just to prevent sticking right after you drain it (and once I did exactly this, out of desperation, at someone else's house), but really, do not let the pasta sit in the sink.

8. SERVE THE PASTA MIXED WITH THE SAUCE. I was often served pasta and sauce in separate bowls. This basically has the same effect of letting the pasta sit in the sink. It will get cold and stick, and it won't mix well with the sauce once you finally mix it. If you're using an uncooked sauce, like pesto, mix pasta and sauce in a bowl and serve it. If it's a cooked sauce, then mix or even sauté pasta and sauce together in a hot pan.

9. EAT IT, NOW! Pasta should not sit there and wait for you to finish your cocktails, appetizers, or whatever. It should be eaten nice and warm and still al dente. If you let it sit, it will continue cooking and become horribly mushy. So once it's done, please serve it and eat it. The only exception is lasagne, which keep pretty well even for a couple of days (if prepared correctly).

10. DRY BASIL TASTES TERRIBLE. Many pre-made tomato sauces contain dry basil, which has a very off, dark, and overpowering flavor that immediately signals a foreign interpretation of pasta. Read the ingredients of the sauces you buy and make sure only fresh basil is used. Needless to say, do not add dry basil to any Italian preparation. Promise?

11. NO CHICKEN ON PASTA. Pasta works wonderfully with pretty much anything. In the end, you should think about it as bread. Instead of a sandwich, you're eating vegetables, meat, fish or whatever with this amazing starch. Still, a grilled chicken breast should never be placed on top of pasta. It's really hard for me to explain why, but the combination has a bland and microwave-y flavor no matter what spices and cooking method you use. If you really insist on pasta with chicken, that's fine,  just don't serve it to your Italian friends. They won't understand.

Now you can move on to the next post on the subject, Perfect Pasta: Dead Chef's Technique.