Showing posts with label Italian Food. Show all posts

Tuesday, April 26, 2016

SPAGHETTI WITH PISTACHIOS, PANCETTA, ROSEMARY


Spring is here! I know I should be happy for the gorgeous weather, the young new leaves, and the litters of kittens and puppies being born everywhere (adopt!), but I’m really a Fall person at heart, in love with its decadence and melancholy and with me not sweating like a menopausal marmot trapped inside a mosquitoes-infested clambake. Also, Fall means my kids will be in school… What can I say? Spring and its mad energy never really did it for me. The only way to mitigate the annoyance of my spring rut is , unsurprisingly, spring food.

Today’s recipe is a very simple pasta that my Sicilian grandma used to make: spaghetti with pistachios, pancetta, and rosemary. And before you get too excited (I know you are—that combination does sound fantastic), I have to disclose that I’ve been researching this recipe, and it doesn’t seem to have any history or claim to tradition. It’s just something my grandma picked up somewhere in the 90s (perhaps even from a woman’s mag) and presented to us grandchildren to a thundering applause.

This pasta dish is very easy and quick to make, and packs a lot of flavor with the use of fresh rosemary. Also, it’s nice and oily and has a great crunch, which makes it a really fun dish to serve to family and friends.


Now, you might wonder what exactly makes this a spring pasta, since all ingredients can be found all year long. Well, pistachios and rosemary are green, right? And pancetta cubes look like little rosebuds just about to bloom. And frankly, just let it go. NOT in the best mood here.


And since we're making pasta, let's refresh our basic pasta skills:


SPAGHETTI WITH PISTACHIOS, PANCETTA, ROSEMARY

Makes 4 portions
  1. 1 tbsp EVOO
  1. 1 small onion, finely chopped
  1. 2/3 C cubed pancetta
  1. 1/4 C dried shelled pistachios
  1. 1 rosemary sprig
  1. 10 oz spaghetti
  1. salt & pepper to taste
Instructions
  • Start making the pasta in a large pot like I explained before (see links in post).
  • While the water is heating up, heat the EVOO in a frying pan.
  • Add the onion and the pancetta and cook at medium-low heat until the pancetta is crispy, and the onion is soft and golden, 5 to 7 minutes.
  • Once the pasta in the pot: In a food processor, coarsely grind the pistachios and the leaves from the rosemary leaves. You should aim for a medium grind.
  • Drain the pasta, and stir in the two mixes until pasta is well coated.
  • Add fresh ground black pepper to taste

  1. .
Tuesday, February 23, 2016

HOW TO DEAL WITH NEWBIE PARENTS (A PARABLE)

Over the Christmas holidays I had an Italian friend visiting with her husband and 2-year-old son. I love them all dearly, and it was great to speak my native language daily and relax into the comfort of our shared cultural background. From the very beginning, though, I had to struggle with the evident difference between my life as a mother of two and my friend's life as a mother of one. Let's see how it went.


My friend's child spent his time adorably playing by himself, going on fun museum outings with his parents on public transportation, showcasing his amazing potty-training abilities, and recounting his adorably inventive imaginary adventures with the sweetest voice ever. In two weeks, he cried TWICE. My friend was calm, competent, and rigorous at all times. 


My kids spent their time screaming for joy or anger, begging for clementines at all hours of the day while refusing to eat during proper mealtimes, and generally displaying their territorial nature with the ferocity of male teenage Komodo dragons. At various intervals, they would toss off their clothes and run naked up and down the stairs, throwing toy cars at each other. All the while, my parenting action was limited to sighing, changing diapers, picking up scattered underwear, and occasionally pleading them to be "gentle". I collapsed on the couch A LOT.

...

Frankly, it was embarrassing. As a Xmas host, I should have provided my guests with a safe winter haven filled with joy and family fun rather than a tableau vivant of squalor and despair only to be photographed in the starkest of B/W. My knee-jerk reaction, of course, was to reject any guilt and toll the "you-just-wait" bell, but I knew that would have made me feel even worse. What right did I have to burst my friend's happy parenting bubble by telling that her beautiful family was just a delusion ready to be destroyed completely and permanently by any additional spawn?

I looked at my friend, all fresh and innocent, and caught a glimpse of my old efficient self in the half-forgotten years when I only had one child. When MiniBee was the sole center of my world, I was the one folding cloth diapers. I was the one setting weekly playdates at the zoo and making homemade yogurt topped with freshly-grated apples. I was the one insisting that we have a full meal at the table and we seldom or never watch TV. Yes, dear friend. I was once young and beautiful, too.

So what happened? What came that transformed me from a busy mother into this zombie of dejection, capable only of refilling Cheerios and shaking her head slowly?

Well, Microbee happened. I know that. But I also know that I can do better, even just a tiny bit. I might not be ready to take both kids on a museum outing on public transportation—fuck that—but I can go back to some of the principles I once had. I can start with food, for example. Take my friend: She is a stickler for fresh vegetables. Once she served us grated beets and, to my complete surprise, my kids loved them—especially when they learned their poop would turn red. How great is that?

grated beets
A gory close-up of your kid's new favorite snack.

From now on I can grate beets for lunch, and watch my kids eat vegetables happily while sitting at the table. Their smiles will shine through their red-stained faces, and suddenly they will look like zombies just like me, and it will feel wonderful.

So if you have 2+ kids, don't look at newbie parents as lucky bastards who have it all easy. Just try to be inspired. I believe that, as mothers and fathers (of any number of kids), we are all on our individual journey of discovery and humiliation, reaching each stage at our own speed. Some of us will enjoy more breaks than others, but it really doesn't matter. Because one day, we will all be there together, calling our adult, well-adjusted and ungrateful kids on the phone just hear it ring again and again without answer... deep into the bottomless void of our self-sacrifice.


Tuesday, December 22, 2015

MINI HOLIDAY GIFT GUIDE: BIALETTI MOKA POT (AND TUTORIAL)


A few weeks ago, I thought to myself, "Should I work on a new holiday gift guide?" My answer was resounding "Nah" (as resounding as a "nah" can be), because I thought the 2014 holiday gift guide covered pretty much everything, especially with the suggestion of a labor-free staycation for mothers that I hope Mr Bee is considering.

Then I remembered there's a product so pretty, so Italian, so dear to me, and so reasonably priced that I have to recommend it to you for this holiday season. I'm talking about the caffettiera, or moka pot, the wonderful contraption that gives you a wonderful, strong coffee in minutes right from your stovetop. Coffee made with a moka pot is similar to espresso in its dosage (roughly) and instantaneous kick, and it is served in an espresso cup, sometimes with one or two teaspoons of sugar and/or a dash of milk. I believe every Italian household owns a few moka pots in various sizes, and drinks moka coffee first thing in the morning, after lunch, and with friends when they drop in for a visit.

There are many beautiful moka designs from different brands, but my favorite is the aluminum Bialetti pot patented in 1933 by Alfonso Bialetti and carrying the classic logo of the "little guy with a mustache" that you can see on the right. (Now that I think about it, they could have found a more inventive name for an Italian mascot.)

Here is everything you need to know about your moka pot once you decide to gift it or in case you become a lucky giftee. Read on.

HOW TO BUY 

You can find Bialetti pots online and at many Italian specialty stores. For a beginner, I'd recommend to start small with a 1- or 3-cup moka pot (around $25 for the latter) and a packet of replacement gaskets ($3.80 on Amazon). I'd also recommend enriching your gift with a bag of ground coffee, ideally from Lavazza or Illy moka or espresso ground (but once you get addicted, Café Bustelo at CVS purchased at dawn will also do). If you're dealing with a coffee lover, I would visit your local coffee roaster and ask for a dark or medium roast ground a little finer than drip coffee but a little coarser than espresso. And in case you're dealing with someone very special, you could gift a set of espresso cups, too.

FIRST DAY WITH YOUR MOKA POT

A moka pot needs to be thoroughly cleaned before it can produce proper coffee. Wash the three main parts (see diagram below) with warm water ONLY, then run the pot with only water for 3-4 times to remove any protective residue. I know you don't know how to use it yet, but I guess you'll have to read the entire post.


MAKE MOKA COFFEE!

1. Fill the bottom container with filtered water up to the internal valve.


2. Insert the funnel and fill it with ground coffee. You can make a small pyramid here, but in any case, NEVER press the coffee. Remove any ground coffee on the filter rim.


3. Screw on the top container. No need to apply a ton of strength here, but do a decent job so your coffee doesn't come out from the sides.


4. Place the moka on a low heat until the coffee emerges and fills the top container. If you're in another room, you'll be alerted by your moka's happy gurgling. DO NOT leave the coffee boiling any longer: It will taste burnt and awful, and you run the risk of ruining the gasket.


5. Pour your coffee, doctor with sugar and/or milk (or sambuca, or grappa) if this is what you're into, and drink.


MAINTENANCE

Maintenance for a moka pot is very easy. Wash the three main parts of the moka pot after each use with warm water, never with soap or detergent. You can use a stiff plastic brush to remove stubborn residue. Leave the parts to dry on a rack. Done!

Every six months, or whenever necessary, disassemble the moka and wash each part thoroughly making sure the filter is clean and the gasket is clean AND still soft. Run water through the moka chimney and make sure the valve is clean. If the small metal piece sticking out from the valve doesn't pop in when pressed, it means that there's coffee residue that needs to be cleaned. To remove limescale buildup, fill the bottom container with water and a little vinegar or lemon juice and let it boil for 10 minutes or more.

Replace gasket and filter as necessary, usually when they have become irreparably dirty, hard, or when coffee starts to sputter or comes out in only in part.

To read a poignant reflection on the diverging attitudes towards coffee for Italians and Americans, read Slow Food/Fast Coffee.


Tuesday, November 3, 2015

A TALE OF TWO TUSCAN RICE CAKES

Torta di riso alla Carrarina - Tuscan rice cake with rum and custard


My mom is visiting from Italy. Her presence has of course been a great help with my two children, but has also turned into an opportunity for me to rediscover old recipes–both from my childhood and from the land of my grandparents. My maternal grandfather was from a tiny town in the north of Tuscany called Montignoso, an adorable little place that I remember fondly for the cute-as-a-button farm behind my grandparents' house (bunnies everywhere) and the amazing food we got to eat everyday. My favorite memories concern a fantastically oily and delicious farinata (a simple triumph of chickpea flour and olive oil), the soft and sweet donuts filled with pastry cream called bomboloni, and the torta di riso alla Carrarina, a custardy rice cake infused with rum that I would savor in slow, meditative bites in a state of generalized gratefulness. 

It is this rice cake that my mother and I decided to prepare a few weeks ago. We used the recipe from our relatives in Tuscany and we set to work right away, following the original recipe to the letter in excited and deferential expectation. Two hours later we were both kneeling in complete awe before the most beautiful and perfumed cake we had ever baked in our lives. The top of the cake was perfectly caramelized, almost brûlée, and smelled of rum and lemon and vanilla like a mythical Arcadian paradise. We then tentatively tasted it, and there it was, the wonderful physical manifestation of my childhood's torta di riso in all of its starchy, custardy, and boozy glory. The rice worked as a soft crust, and above it was the perfectly firm custard that gently yielded to the pressure of our spoons. It was a complete success, with a touch of divine apparition.

But as much as this success made me proud, there is the dark side of this story. A week later, I decided to make the rice cake again for friends, and I had the gumption to add my "personal touch" by cutting the original amount of sugar and substituting rum with bourbon. I mixed the ingredients quickly, distractedly, arrogantly–leaving some unbroken lumps of egg white in the custard ("It'll work fine"), and threw the cake into the oven. When it finally came out, an unsettling feeling grabbed the pit of my stomach, telling me that the gods of Italian food had decided to punish my insolence. The surface was not as caramelized as the first time, and the lumps of egg white had solidified independently into an unappealing reminder of scrambled eggs. When I finally tasted the cake (in the company of my guests, no less), I had to admit to myself with great shame that the bourbon was almost undetectable, and that the lack of sugar had allowed the eggs to dominate in flavor. It was a half sweet, eggy frittata with a base of lumpy rice, a grotesque imitation that filled me with shame and my guests with useless cholesterol.

I apologized to my friends and family for the botched rice cake, and then closed myself into my confessional pantry—my altar to Italian food—and promised to never again take lazy initiatives with perfect Italian classics. No rash substitutions, no presumptuous subtractions, no distractions. Just humble, grateful respect. And you, reader, should do the same.

Read about another of my baking fails in Happy Easter, Bitter Memories.
Torta di riso alla Carrarina - Tuscan rice cake with rum and custard
A slice of the good torta di riso.

TORTA DI RISO ALLA CARRARINA


1/2 C short-grain white rice (Arborio or Carnaroli, but I used sushi rice and it worked fine)
5 eggs
1 1/4 C sugar + a tbsp for dusting the pan
1 tsp vanilla extract
1 lemon (zest and juice)
2 C whole milk
1/3 C rum
a pinch of salt

  • Cook the rice in 2 cups of lightly-salted water for no more than 10 minutes. Rice should be al dente. 
  • Drain the rice and let cool.
  • Preheat the oven to 350 F.
  • Butter a 10'' cake mold and dust it with sugar.
  • In a large bowl, mix together the eggs, sugar, lemon zest and juice, milk, and rum. Use a spoon for this, and make sure all of the egg white is broken to avoid a scrambled-egg top (no big lumps, just very small patches).
  • Add the rice to the mix. It will be very liquid.
  • Pour the mixture into the cake mold.
  • Carefully transfer the cake into the oven, and bake for one hour, or until custard has set and looks brûlée like in the picture above (do not skip the browning!). If you're using a glass mold, it will take you up to 90 minutes.
Serve cake lukewarm or at room temperature, or the next day (it really shines after resting for a bit).

Tuesday, October 20, 2015

TRIXIE CAKE (INSPIRED BY A TRUE PITBULL)


Up until five years ago, there was only one baby in my life, and she was cuddled and adored beyond imagination. I had hundreds of pictures of her in my phone, I would cry when I had to leave her home during my Italian trips, and I made sure she was raised a classy lady, exposed to the best Italian cheeses. Mr Bee and I nicknamed her "Most-Kissed Dog", and one night I even got on my knees and asked her to marry me. That baby is now 7 years old, and her name is Trixie: She's my crazy pitbull mix.

After the birth of my two boys, the level of attention that Trixie was used to plummeted in a way that I'm not proud of (I'm not going to bore you with details, but my sentiments are perfectly expressed by this spot-on apology by The Ugly Volvo). Nonetheless, Trixie will always have a huge and special place in my heart that I want to celebrate today.

Trixie is the most hyper and affectionate dog you'll ever encounter, a canine tornado of love whose only goal in life is to French kiss all of our guests. Once she calms down from her bursts of PDA (it might take hours with our dog-loving friends), she will curl up into a ball right next to you, wagging her tail every now and then to show you that her love is real. And given my food-centric view of the world, the first time I saw her curl up to sleep, the only thing I could think of is that she looked like the most amazing marble bundt cake.

The "donut" position gets tighter in winter.
I started researching recipes to replicate Trixie's beautiful, dark brindle coat as closely as possible, and that's when I found that I could get pretty close with a standard marble cake, including one that used used cocoa and apple butter. However, I wanted a more distinctive flavor, so I replaced the apple butter with pumpkin butter, and then reworked the amounts of butter, sugar, and yogurt so that the cake would be rich and sugary to my taste (universal tip: more butter, less sugar). I then doubled the amounts to make a bundt cake. 

After several attempts, I can say that my current Trixie Cake is perfect: a soft, fragrant cake that all of the talking men in my house have on permanent request for birthdays, holidays, Sundays... you get the idea. The pumpkin butter really comes through and pairs very nicely with the cocoa, and the yogurt makes it moist and soft as I like it. The visual effect is a perfect representation of Trixie's brindle coat, with reddish and dark brown layers rolling together into crumbly ribbons. It's such a pretty cake in her unassuming simplicity, and I almost feel bad cutting it: She looks so cute when she sleeps.


TRIXIE CAKE


3 1/2 C all-purpose flour
2 tsp baking powder
2 tsp baking soda
1/2 tsp salt
1 tsp cinnamon
1 1/2 C sugar
2 sticks of butter, at room temperature
2 C plain yogurt (no-fat works fine)
4 eggs
2 tsp vanilla extract
juice from half a lemon
1/3 C pumpkin butter (for a change of flavor, pear butter is the best alternative)
4 tsp powdered cocoa

Utensils: Bundt cake mold
  • Preheat oven to 350F degrees. Butter and flour the cake mold.
  • In a large bowl, mix together the flour, baking powder, baking soda, salt, cinnamon, and sugar.
  • Mix in the butter in small pieces, and then pour in 1C of yogurt until mixture comes together but is still very lumpy.
  • In another large bowl, mix together the eggs, vanilla, lemon juice, pumpkin butter, and the rest of the yogurt until well combined.
  • Add the wet mixture to the flour mixture in 2 or 3 batches, mixing until just combined.
  • Transfer half of the resulting batter in the bowl that is now empty, and then mix in the cocoa until well combined.
  • Pour the chocolate batter into the other batter, stirring with a spatula just a few times in order to create a marbling effect.
  • Pour the final batter into the cake mold, and place in the oven for 50 minutes, or until a toothpick inserted in the thickest part of the cake comes out clean.
Very important: Trixie Cake is best served with a dollop of whipped cream to reprise the white marking Trixie has on her chest—and the whipped cream might or might not be spiked with bourbon according to whom is going to eat it.

And here's another shot of Trixie, because you deserve it.

Wednesday, September 2, 2015

FIGS ARE HERE ☞ FRESH FIG AND OLIVE OIL CAKE

Fresh fig and extra-virgin olive oil cake

I love the end of summer for a variety of reasons: Days are getting cooler, the sun is not slapping me in the face at every occasion, the kids are back at school, people have stopped asking me to go to the pool (it's not happening—way too much work), and mosquitoes seem less ferocious after two months of vampirism. My favorite season, fall, is peeking at me from the end of September with its lovely smile, and I feel happy. To make things even better, my favorite fruit has come back to me: Oh juicy, sweet fig, welcome back to my supermarket shelves! I'd plant a tree for you in a heartbeat, but I don't want to share you with my neighborhood rats.

To celebrate, I decided to work my beloved figs into yet another recipe. I looked inside my pantry, and was reminded of a 5-gallon tank of family produced extra-virgin olive oil that my father brought over from Italy, so I thought about a fresh fig and olive oil cake. Perfectly Mediterranean, and perfect for the cool days of summer's end. I used this recipe for a Rustic Olive Oil Cake with Honey Syrup from Serious Eats as a base cake, and made a few modifications. Namely, I cut the sugar amount in half and counted on the fig to provide most of the sweetness. And no Grand Marnier, just Meyer lemons. Finally, I replaced the milk with plain kefir, which worked brilliantly and delivered a fantastic moistness to the cake.

And about this, always (ALWAYS) add yogurt or kefir to your cakes. I've been doing this for almost 20 years now because it works wonderfully in keeping your cakes moist and soft. Did I just say 20 years? How is that even possible?!? Did I really start not only making desserts but willfully tweaking recipes that long ago? I'm shocked. Better have a slice of fig cake to calm myself down.

And if you need more figs ideas, check these old posts:

FIGS ARE HERE ☞ FIG TART
FIGS ARE HERE ☞ ROASTED FIGS

Fresh fig and extra-virgin olive oil cake.

FRESH FIG AND OLIVE OIL CAKE


2 C all-purpose flour
1/2 tsp baking powder
1/2 tsp baking soda
1 tsp kosher salt
1 1/4 C plain kefir (or 1 C milk and 1/4 C plain yogurt)
2 Meyer lemons (for juice and zest)
3 eggs
1 C sugar
1 C EVOO
10-12 figs or whatever you have or it takes, halved 
powdered cocoa
  • Heat the oven to 375 degrees.
  • Line a 9'' round cake mold with parchment paper. 
  • In a large bowl, stir the flour with the baking powder, baking soda, and salt.
  • In a smaller bowl, mix the kefir with the juice of the Meyer lemons, and then stir in the zest from one of them.
  • In yet another small bowl, whisk together the eggs and the sugar, and then slowly pour in the EVOO, whisking constantly.
  • Add the contents of the two smaller bowls to the dry ingredient, in batches. 
  • Stir in until combined.
  • Pour the batter into the cake mold, and the top with the halved figs.
  • Back from about 50-60 minutes, or until the cake appears lightly browned on the top, and a toothpick inserted in the middle comes out clean.
  • Dust cake with powdered cocoa.
Best served at room temperature or warm.

Tuesday, July 14, 2015

I'M HOT AND YOU'RE COLD: CAFFÈ SHAKERATO


I need to voice one regret I have about my expat life, and that is that I moved from the horribly humid and mosquito-infested Venice summer right to the horribly humid and mosquito-infested DC summer. It was really a masterstroke for someone who, when exposed to summer heat, turns into a wheezing fuchsia toad covered in welts. And yet here I am, surviving in DC in July (barely but surely) thanks to my highly refined immobility skills and Arctic A/C. What also helps? Caffè shakerato, or Italian ice coffee.

I don't need to convince anybody of the worthiness of ice drinks, and ice coffee in particular. And yet, many times I've felt like regular ice coffee doesn't really cut it, mostly because the melting ice tends to water down the coffee flavor and its ability to wake me up from my heat-induced stupor. The only answer is the Italian variation of ice coffee that is caffè shakerato. This is basically a long shot of espresso, sugared to taste, and shaken in a cocktail shaker so that it produces a thick and lovely foam on top. In Italy caffè shakerato is served everywhere, usually in a Martini glass, and it can really be a glorious break for your summer afternoon.

That's my husband's hand. I don't know why I get so paranoid about you thinking it's mine.

However, if your coffee bar doesn't serve caffè shakerato and if you don't care about formalities, you can make one at home very easily and drink it whenever you prefer. What I do is add a little bit of sugar to my coffee and shake it in a canning jar with three ice cubes. It's ready in 15 seconds with minimal amount of physical effort (which is really all I can afford in 99% humidity), and cools me down and wakes me up in no time. I almost (almost) feel like a functional human being when I drink one. Give it a shot.
CAVEAT! To make caffè shakerato, you can only use espresso or coffee made with a moka pot. If you don't have an espresso machine, I really suggest you get hold of a moka. It's fairly inexpensive, it's quick and easy to use, and it's one of the most beautiful objects you can own. Until I write a post about it, learn how to use it here.

CAFFÈ SHAKERATO 

Makes 2 coffees

Equipment needed: espresso machine or moka pot, one-pint canning jar

2-3 shots of espresso, or the coffee brewed in a 2-Serving moka pot
sugar to taste
5 ice cubes 


  • Brew the coffee, with a little bit more water than usual.
  • Add sugar to taste and stir well until dissolved.
  • Place the ice into the canning jar, and pour in the coffee.
  • Close the jar tightly, and shake vigorously for no more than 15 seconds. 
  • Pour the coffee into two glasses, holding any leftover ice in the jar with a spoon, letting the coffee foam pour over your coffee in all its luscious creaminess.

Wednesday, June 24, 2015

STRAWBERRY RICE TORTE

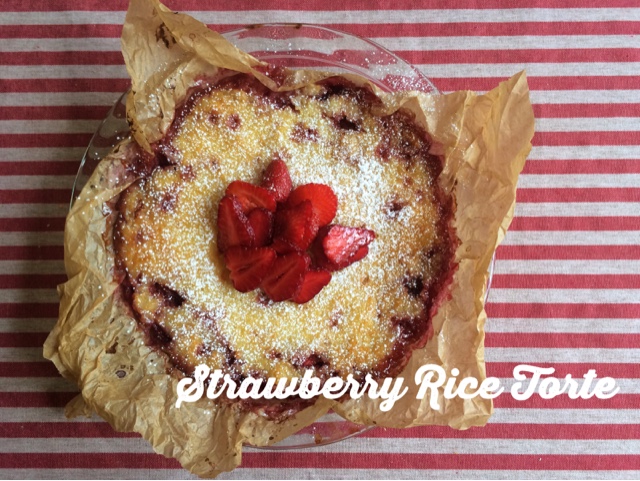
Strawberry Rice Torte, or rice pie with strawberries.

I love spring because my CSA starts again, rescuing me from a winter of badly-planned grocery shopping where I fill my house with too many cabbages destined to be forgotten in the back of the fridge. I always have grandiose plans for my cabbages, plans I promptly forget when I need them, as if they were only beautiful dreams from the deepest of sleeps. But I digress... Back to my CSA. This week, I bought a pint of pulpy strawberries that looked and tasted too good to be wasted on my kids' afternoon snack. (It's not that my kids don't deserve good strawberries, but the afternoon is usually a time of angry screaming and hurled toys, so rock-hard pears would do just fine. Am I digressing again?) I thought about it for a while, and I remembered the recipe for Strawberry Risotto that I had so loved in my childhood. I probably had it only twice then, but I tried it again a few years ago and found it lovely.

I thought that recipe for Strawberry Risotto would be perfect for the blog, so I started researching its origin to give you, my dear readers, some damn culture. As I started my Web browsing, I was already beginning to imagine an adorable alpine village in the north of Italy, nestled in the middle of a perfumed grazing pasture and animated by colorful wildflowers waving in the breeze. There, a small group of stern but kind matrons would throw handfuls of fragrant wild strawberries in a rice cauldron, stirring the Risotto with their massive wooden spoons around and around... Sadly, my Italian daydreaming was stopped short. My research immediately revealed that Strawberry Risotto was not an ancient Italian tradition. In fact, it's nothing but A FANCY RECIPE FROM THE 70s, a self-satisfied gimmick of a culinary period that thought itself above history and taste, and possibly the Italian equivalent of this Chicken Fricasee. My bucolic fantasy was shattered. I saw the wildflowers wilt with a cracking sound, and adorable black-and-white cows stampede all over my imaginary matrons and their northern village. A cloud of hairspray engulfed the land, and massive vol-au-vents began hailing all around me. Then everything turned glossy, and I passed out.

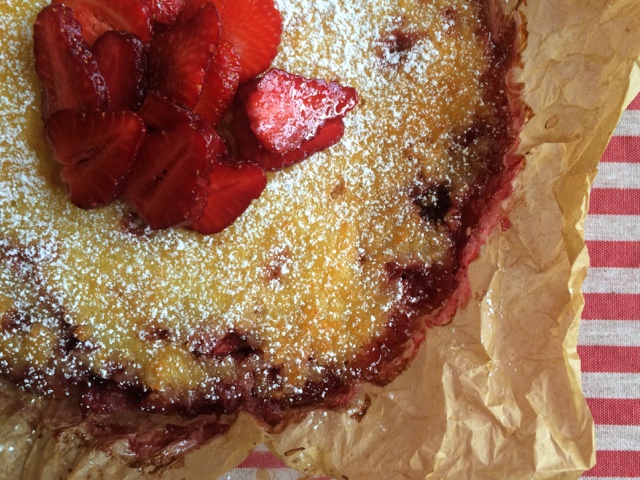
Well, not really. I find 70s food amusing, actually, but this time I wasn't interested, so I decided to employ my strawberries in a different direction. I still liked the idea of rice and strawberries, and so I researched a dessert that would use them both. I found this recipe for Torta di Riso al Balsamico con Fragole, which is fancier than my adaptation here given its inclusion of balsamic vinegar, but whatever. What I did was a very simple sushi rice cooked in milk and then mixed with sugar, egg, and a little rum. I spooned the mix into a cake pan in two batches, so that I could have a layer of sliced strawberries in the middle. The result is a simple, pretty cake that is the emblem of spring. It is light and delicious, and perfect for a picnic. And, in case you need it, it's also gluten-free.

Garnish it with good fresh strawberries, if you have them, and eat it warm, or at room temperature, or cold. And let's forget that the 70s are back.

Strawberry Rice Torte, or rice pie with strawberries.

STRAWBERRY RICE TORTE


3 C milk
1 1/2 C sushi rice (or other short-grain starchy rice like Arborio)
1 C sugar
6 tbsp unsalted butter at room temperature
3 eggs
1 tsp vanilla
3 tbsp rum
1 Pint of strawberries (half for the filling, half or less for topping or accompaniment)
  • Heat the oven to 350 degrees.
  • Cook the rice in milk on the stove until cooked through, then transfer to a large bowl and allow to cool down.
  • While the rice cooks, wash and slice half of the strawberries.
  • Stir in the butter (broken in little pieces), the eggs, the vanilla, and the rum.
  • Line a 9'' round cake pan with parchment paper (or butter and flour the pan if you prefer), and pour half of the rice batter in.
  • Arrange the sliced strawberry in a single layer over the rice batter.
  • Pour the second half of the batter over the strawberries, then slide the cake pan in the oven for one hour, or until cake is firm and top is slightly golden.
Note to ramekin lovers: This recipe works great in individual ramekins as a spoon dessert. Just check the ramekins after 35 minutes for doneness. 

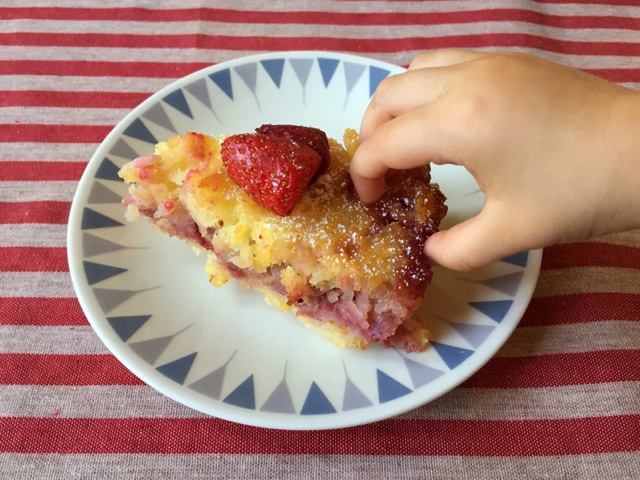
Slice of Strawberry Rice Torte, or rice pie with strawberries.
Microbee's unforgiving claw.

Wednesday, May 13, 2015

HAPPY PASTA (PUT AN EGG ON IT)


In the past years, there have been few things that made me happier than the rehabilitation of the egg as a health food. It is really up there with the comeback of leggings and the birth of my children. Really, I love eggs. I love them in all their gastronomic incarnations and for their simple beauty (please check my humble Pinterest homage, "The Egg Came First"). In fact, I'm pretty sure my elder days will see me as an Italian-American version of Edith Massey's Egg Lady, juggling hard-boiled eggs in the air and dishing out frittatas left and right. You've been warned.

You can only imagine how I felt when I found the recipe for "pasta with a fried egg" in a tome of ancient traditional Italian recipes that a friend gave me when I moved to the United States. The dish is from Calabria, the region of bold and spicy flavors, and is so simple and genius I could not believe I had spent thirty years of my life without it.

So, what's pasta with a fried egg about? Well, it is simply good-quality spaghetti tossed with extra-virgin olive oil, red pepper flakes, and pecorino, and then topped with a fried egg. Once the dish is presented to you in all its sunny cheerfulness, you just break the egg with a fork and release the runny yolk for your personal, instant mini-carbonara.


The first time I made it for myself and Mr Bee, we became almost giddy with joy. This spicy, hearty pasta was flavorful and creamy, and probably one the best examples of old-Italy comfort food. Also, for someone as lazy and perennially late as I am, I could not get over about how easy it was to make.

Now to the important stuff. For a dish this simple, the pasta needs to be good quality, which means it needs to have flavor on its own and be able to keep "al dente" (many low-quality pasta turn to glue a minute after you take them out of the pot). For the past few years, I've been using Trader Joe's organic spaghetti, but they've recently changed brand, and I still need to test it. I think De Cecco pasta should work, and you definitely can use hardier long pasta like Venetian bigoli or bucatini. In a pinch, and for a healthy accent, I like to use Trader Joe's whole-wheat pasta, which has surprising great bite and taste. I know that's not traditional, but we're not purists here: We just have standards, right? One last piece of advice: I would not use egg pasta; as much as I love eggs, that would be redundant.

So let's celebrate the good weather we're having and the decreasing pollen count with a simple, quick, cheap, and happy pasta that is as fun to serve as it is to eat. And for the hearts of stone out there, how can you resist that yolk's adorable stare? DIG IN.


PASTA WITH A FRIED EGG


Makes 4 portions

10 oz spaghetti (good quality)
1/2 C grated Pecorino
1 whole dried red pepper, crushed, or 3/4 teaspoon red pepper flakes (or whatever you feel comfortable with)
3 tbsp EVOO + more of drizzle on pasta
4 eggs (preferably pasteurized)


  • Cook the spaghetti al dente in a large pot of salted water.
  • While the spaghetti cook, fry the eggs in the EVOO until the whites are firm, and the yolks are still runny.
  • Drain or scoop the pasta out of the water (you want it to retain some of the water to better bind with the other ingredient) and place in a bowl. Stir in the Pecorino, the red pepper, and some more EVOO to taste.
  • Divide the pasta on the plates, and top each with a fried egg.
  • Sit down to eat, chop the egg coarsely with your fork so that the yolk runs all over your pasta, and enjoy.

And since we're making pasta, let's refresh our basic pasta skills:


Tuesday, April 14, 2015

NOT TOO LATE: MALLOREDDUS WITH LAMB RAGÙ

Malloreddus with lamb ragù, a Sardinian pasta

One of the main differences between Dead Chef and a serious food blog is that the serious food blogs publishe holiday recipes on time, so that readers have all the time to make up their minds on their menu, buy the necessary supplies, and even attempt a recipe once before the big day. So it is with a little shame that I present you with my Easter recipe a full two weeks after Easter. The recipe is Malloreddus with Lamb Ragù, which should lessen the shame quite a bit since it's a pretty damn delicious.

So, Easter. I love lamb: so soft, so flavorful, so fat. It was one of the main reasons that Mr Bee and I spent our honeymoon in Sardinia, the beautiful Italian island that is heaven on earth and that perfected the use of lamb in cooking to an art. Among the million amazing dishes we tried on our 6-day trip (we ate in our sleep, too), there was a simple pasta with a lamb ragù that captured our hearts and possibly initiated their clogging. The pasta was malloreddus, a traditional small "dumpling" you can find in specialty stores or at conventional grocery stores under the name of "gnocchetti".

The main focus of the recipe, however, is the lamb ragù. I based my recipe on the Florentine ragù preached by Giuliano Bugialli in his precious tome The Fine Art of Italian Cooking (incidentally, a great culinary history book, too). I made Bugialli's ragù many times with beef, veal and pork, and even turkey (surprisingly flavorful), and it always comes out extremely well: rich, earthy, velvety, and abundant. I believe the secret lies in the use of dried porcini mushrooms to impart a robust, earthy vigor to any sauce. You might want to find some good-quality dried porcini for this; I get mine straight from Italy.

Once you have your lamb ragù, you just mix it with the cooked pasta and serve the dish drizzled in good extra-virgin olive oil and topped with grated Pecorino. It's a super-flavorful pasta with the pomp of a winter recipe and the simplicity of a last-minute spring lunch. Perfect for Easter, then, or right afterwards.

Malloreddus with lamb ragù, a Sardinian pasta


MALLOREDDUS WITH LAMB RAGÙ

FOR THE RAGÙ

4–5 large pieces of dried porcini mushrooms 
3 tbsp EVOO + more to top off pasta in the end
1 onion, minced
1 carrot, minced
1 celery rib, minced
1 garlic clove, crushed
1 tbs tomato paste
1 lb ground lamb
1/2 C red wine
salt and pepper to taste
1 lb canned tomatoes (preferably San Marzano)
1 1/2 C vegetable stock

1 lb malloreddus (or Barilla "gnocchetti")
3–4 tbsp grated Pecorino, preferably Sardinian


  • Soak the mushrooms in a cup filled with warm water for at least 20 minutes.
  • Make the soffritto: Heat the EVOO in a large pot (I use a Dutch oven), and then add the garlic, onion, carrot, and celery and let cook at a low heat until soft and a little caramelized. You might want to splash some water here and there if the soffritto ever gets dry.
  • Add the tomato paste and cook for 2 minutes.
  • Turn the heat to medium, and mix in the ground lamb. Sauté for 15 minutes, then spoon off most of the fat. Unless you want to keep it, of course. I'm not judging. *tips hat*
  • Add the red wine and cook until evaporated, for another 10–15 minutes.
  • While the wine cooks down, pureé the tomatoes with an electric blender.
  • Once the wine is cooked down, add salt and pepper to taste and mix in the tomatoes.
  • Lower the heat and cook for 25 minutes.
  • Remove the porcini mushrooms from the water, give them a good squeeze, chop them, and add them to the sauce.
  • Strain the water from the dried mushroom through paper towels or a fine sieve to remove any grit.
  • Add the mushroom water and vegetable stock to the ragù and cook for another 1 1/2 hours.
  • Cook the pasta in abundant, salted water, then strain and mix with the ragù in a large bowl.
  • Drizzle the pasta with EVOO and top with grated Pecorino.

Note: If you really cannot find malloreddus, you can use other types of short pasta like conchiglie, orecchiette, elbows... Do not go as small as orzo, though, or it will turn into a sad slop of a dish. 

Another note: The original recipe was for a beef ragù, but I made it with veal and pork and even with turkey, and it always turned out great. And at this point, you can use it for anything you want,  from pasta to lasagne to chili to the Sloppy Joe of you life. 


And since we're making pasta, let's refresh our basic pasta skills:


Wednesday, February 25, 2015

MATCHA CHOCOLATE CAKE

Detail of matcha chocolate cake dusted in cocoa powder and powdered sugar

My oldest son, MiniBee, turned four (!) a couple of weeks ago, an event that was celebrated with friends and with a deluge of Venice Carnival sweets and a two-batch Pandecocco coconut cake. A couple of days later, we also had a smaller family celebration that required yet another birthday cake. As any parent knows, children are only slightly more traditionalistic than the most conservative old-Europe grandparent, so there was no way MiniBee could hear the words "happy birthday" without blowing on proper candles on a proper cake. I needed a recipe, and I remembered one for Chocolate Matcha Bundt Cake from Bakerella (of the infamous cake pops) that had been sitting patiently on my Evernote for at least three years. I love matcha and I enjoyed it in many versions on my 2009 food pilgrimage to Japan, and I especially love how it couples lusciously with chocolate. It all started when a friend gave me an assortment of fancy chocolates that contained a matcha-chocolate combination that was one of the highlights of my life as an eater.

Now, someone could argue that matcha is a risky choice for a preschooler's birthday cake, and I can definitely tell you that when MiniBee heard his birthday cake was made with TEA, he was not at all pleased. But, in rebuttal to any concerns and objections I have two points to make:

1. Children will eat any cake that's placed in front of them, especially when decorated with birthday candles.

2. It doesn't matter whose birthday is it: If I'm baking or buying a cake, I need to like it first.

The second point is actually a corollary of my favorite parenting rule:


Substitute "wear" with "eat" and "oxygen mask" with "damn cake" and you'll see what I mean.

But back to matcha. For the cake, I used some unsweetened matcha powder I bought at HMart. And since the party was attended only by five people, I decided against the Bundt format and made a simple layer cake instead, halving the ingredients and making a couple of variations (more egg, less sugar, and my trusted addition of plain yogurt to guarantee a moist texture). I also suspect the matcha-chocolate combination works best in a slimmer cake. What can I say? I think it's classier this way. And as someone who wears German slippers all year round and whose every food contains 15% dog hair, let me tell you: I KNOW CLASS.

The final matcha chocolate cake was delicious, sweet and grassy and elegant (disclaimer: see my standards above), and perfect to be enjoyed with or without children.

Oh, if you wonder about MiniBee: He had two slices and was happy as a clam. And so was I.


MATCHA CHOCOLATE CAKE

Ingredients

Chocolate Mixture
3/4 cups all-purpose flour
1/4 cup baking cocoa powder
3/4 tsp baking powder
1/4 tsp salt

Matcha Mixture
3/4 cups all-purpose flour
1 1/2 tbsp unsweetened matcha
3/4 tsp baking powder
1/4 tsp salt

Wet Ingredients
1 C sugar
1 stick unsalted butter at room temperature
2 eggs
3/4 C milk
1/2 C yogurt
1/2 tsp vanilla

Directions

  • Preheat oven to 325 degrees.
  • Grease and flour a 9'' springform pan. You can also line it with parchment paper if you prefer.
  • In a small bowl, whisk together the ingredients for the chocolate mixture.
  • In another small bowl, whisk together the ingredients for the matcha mixture.
  • In yet another bowl, cream the butter and sugar with an electric mixer, then add the rest of the wet ingredients.
  • Divide the wet ingredients evenly between the two flour mixtures, stirring until combined.
  • Pour the two mixtures into the pan. Bakerella suggests doing this in tablespoons to maintain the two colors vibrant. I poured half mixture at a time and then swirled them with my finger.
  • Bake for 45–50 minutes, or until a toothpick inserted in the center comes out clean.
  • Let rest of 10 minutes and dust with cocoa powder and powdered sugar.


Tuesday, February 17, 2015

VENICE CARNIVAL: FRITTELLE & GALANI

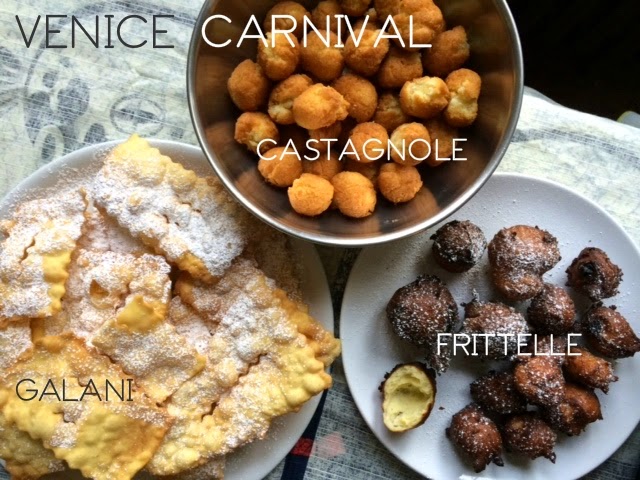
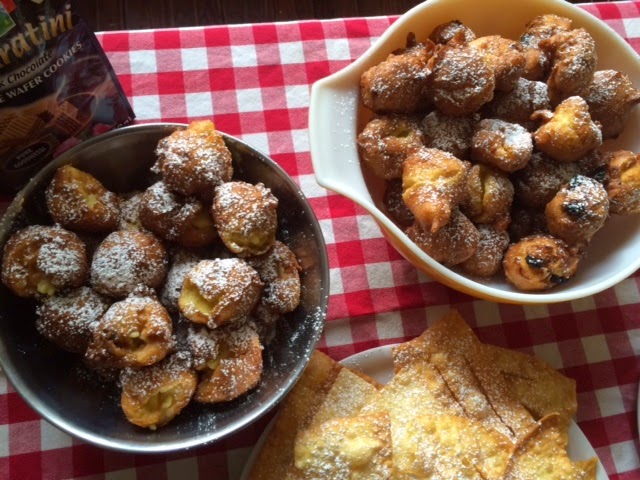
Trays with sweets typical of Venice Carnival: Frittelle, Galani e Castagnole
Today is Mardi Gras, which is the day of the year I traditionally spend sobbing in my pajamas because of homesickness. The reason? In Venice, today is the end of Carnevale ("Carnival" in English, if you seriously need a translation), my favorite celebration of all, and the one I miss the most since I've moved to the United States. Venice Carnival has been synonymous with great fun and great food since I was born. As a little girl, the fun consisted of wearing my chosen costume on multiple occasions—Venice Carnival lasts a little over two weeks—at school, on strolls around my town or in Venice, and at children's birthday parties. During each outing, us kids were allowed to throw confetti in each other's eyes and then litter the streets with colorful serpentine throws. To make things even more interesting, the right princess or pirate costume could grant you multiple fiancés by the age of 9. As a teenager and then young adult, the fun was pretty much the same, but it happened at night and was quite a bit boozier.

Now let's talk about the food. During Carnival, bakeries and pastry shops in Venice and the rest of the Veneto region start churning out an avalanche of amazing fried sweets, namely frittelle, galani, and castagnole. Venetians of all ages stuff their faces with these beloved sweets at all hours of the day. Let's see them in detail:

  • Frittelle are little sweet and soft doughnuts with raisins and pine nuts and sometimes filled with crema pasticcera (pastry cream) or zabaione, and dusted in granulated or powdered sugar. They are the Holy Grail of Venice Carnival foods.
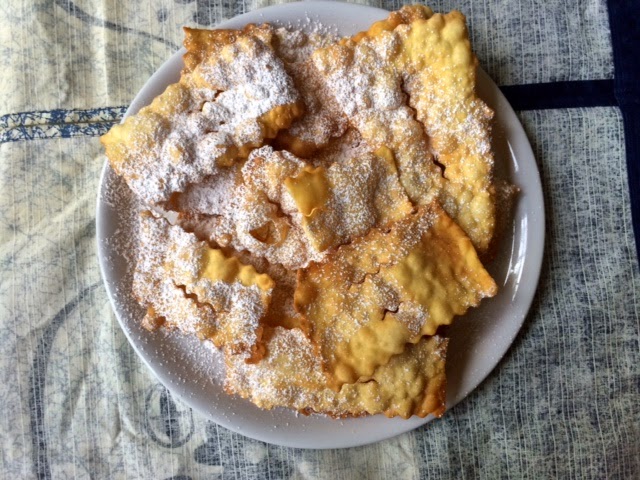
  • Galani are paper-thin rectangles of lightly sweetened dough, deep-fried and dusted with powdered sugar.
  • Castagnole are small round fried cookies very similar to shortbread. For some reason, they are the least popular among Carnival sweets, even though they are completely delicious in their own right. I am afraid they are unfairly obscured by their high-performing cousins (a phenomenon I will now call "Unfair Eclipse Syndrome").

To lessen my desperate homesickness and to share a little of the joy of Venice Carnival with my insatiable children, a couple of years ago Mr Bee and I started to make all these sweets at home with acceptable results. This year, however, we knocked one out of the proverbial ballpark by finally landing two perfect recipes for frittelle and galani that I want to share with you today. Get a Carnival mask on, hang some streamers around your house, gather friends and love interests, and deep-fry these gems: This is the closest you're going to get to my beloved Venice Carnival.

You can read more information about the history of Venice Carnival in this post I wrote for Multicultural Kid Blogs

Venetian Carival Frittelle, with and without custard filling

FRITTELLE WITH CREMA

Makes 20–25 frittelle. Just remember crema is optional: Frittelle are amazing on their own.
Ingredients for crema pasticcera (pastry cream)
1/2 quart of milk (I would not use non-fat here)
lemon rind of half a lemon, cut in one piece (use a vegetable peeler)
4 egg yolks
1/2 cup sugar
1/4 cup cornstarch

Ingredients for frittelle

oil for frying
1 ¼ cups water
pinch of salt
4 tbsp unsalted butter
2 tbsp sugar (that's right)
1 ½ cups flour
6 eggs
orange rind (grated)
2 tsp vanilla extract
½ cup raisins
¼ pine nuts
oil for frying
granulated or powdered sugar for coating


Directions

Make the crema pasticcera
  • Pour the milk in a saucepan, add the lemon rind, and bring to a boil. Turn the heat off and let rest for 10 minutes.
  • In a bowl, whisk the egg yolk with the sugar together until pale yellow and fluffy.
  • Add the cornstarch to the egg mixture and stir together.
  • Remove the lemon rind from the milk, and pour the milk slowly into the egg mixture, stirring to prevent clumps.
  • Pour the mixture back into the saucepan and let it thicken on low-medium heat until it reaches a creamy consistency. The crema will continue to thicken, so leave it somewhat runny.
  • Let the crema cool down before using.

Make the frittelle
  • Place water, butter, salt, and sugar in a small pan and bring to a boil.
  • Add all the flour all at once and stir vigorously until the mixture pulls away from the sides of the pan to form a ball. This takes less than a minute.
  • Let the dough cool, then add one egg at a time. Make sure each egg is incorporated into the dough before adding another one. (I’d use a electric mixer here, if possible. Unless you enjoy the arm workout, of course.)
  • Mix in the the rest of the ingredients.
  • Heat oil to 370F degrees and fry the dough in small balls (use two spoons) for 5–6 minutes, or until golden brown and cooked throughout. Note that frittelle will first puff a little and then puff up even more after a couple of minutes of more.
  • Roll frittelle into granulated sugar or dust with powdered sugar.
  • When cool, fill the frittelle with about a tablespoon of crema pasticcera each, depending on size. I used a whipped-cream syringe similar to this one but way crappier. If you don't have a syringe, I guess that you can cut the frittelle open and fill them with a tablespoon of cream.
*The usual optimal frying temperature is 375F, but that cooked our dough too quickly so it was burned on the outside and still raw on the inside. Five degrees made all the difference!

A tray filled with Venetian Carnival Galani


GALANI
Ingredients

oil for frying

4 eggs
4 cups flour
2 tbsp butter, softened
1/2 cup sugar
1 cup sparkling water
grated lemon rind from one lemon
a pinch of salt
2 tbsp grappa (optional)
2 tsp vanilla extract

Directions


  • Mix the flour, sugar, and butter together until coarsely combined. You might want to use an electric mixer for this part, otherwise use your hands and be quick.
  • Add the eggs, lemon rind, and salt, Grappa and vanilla and mix.
  • Add sparkling water as needed and a little at a time until the dough becomes soft and stretchy. It should resemble fresh pasta dough, if that helps.
  • Cover the dough and let it rest for an hour.
  • Roll out the dough with a roller (champion) or with a pasta machine, going up to the smallest setting so that galani are paper-thin. If you've never used a pasta machine before, check out these instructions.
  • Cut dough into large rectangles with a pasta cutter. (Parents of young children: I couldn't find mine once so I used a Play-doh cutter.) Rectangles should be about 2x4'', but can be VERY irregular, so don't worry too much about it. 
  • Place rectangles on a floured kitchen towel.
  • Fry the galani in 375 degree oil for a few seconds, or until slightly colored and puffed up. 
  • Let rest on paper towels and dust with powdered sugar. Galani last beautifully for 2–3 days in a dry climate.


Thursday, January 8, 2015

ITALIAN BACHELOR'S PASTA (WITH CANNED TUNA)

Farfalle pasta with canned tuna in oil

I don't know how many self-professed "bachelors" are among the readers of this blog, but I'll dedicate this post to them nonetheless. Any of you reading this might know one and send him this recipe to help him through his day. The recipe is for Tuna Pasta, a dish that is mostly, if not exclusively, consumed by Italian bachelors. You might wonder, "Is this pasta going to turn me into one of those suave Italian hunks the whole world cannot take its eyes from?" No, sorry. Those suave Italians à la Marcello Mastroianni, with their impossibly well-fitting suits, their smart and distant gaze, their pitch-perfect flirting skills, and their irresistibly magnetic charm do not cook. They only eat at nice restaurants or cozy trattorie, or they pay a visit to their loving mothers for some exceptional traditional fare. The bachelor I'm talking about is of the familiar dork variety: the one that buys monochrome socks in bulk (I'm not judging, I do the same) and are more than happy to spend their evenings in front of the TV eating the easiest/comfiest meal possible.

The original recipe is very simple. You overcook half a box of short pasta (short pasta requires less water, hence a smaller pan, hence easier dishwashing) and then you plop the contents of a whole can of tuna on top of it. Stir hastily and serve eat.

I have consumed the original tuna pasta in biblical quantities in my life, especially in the years during which my sister and I were living with our divorced dad, who did all the cooking. I remember one glorious 2-week streak of interrupted tuna pasta that finally broke me and helped me decide that I should really learn to cook. So I guess without tuna pasta, there would be no Dead Chef, and what a sad, cold world would that be.

The recipe I want to give you today is an improvement on the basic recipe. It's still simple, but demands the use of a pan to give the tuna some extra flavor. It's comfort food, but with a little more self-respect (let's not kid ourselves, it's delicious!). And sometimes, that's all it takes. Enjoy.

Detail of farfalle pasta with canned tuna and oregano

TUNA PASTA

Makes 2 hefty portions *wink*

1 tbsp EVOO
1–2 anchovies
1 crushed garlic clove
A can of canned tuna in olive oil (like Genova)
1 tbsp dried oregano
Half a box of pasta (spaghetti are best, but short pasta will do)

  • In a large pan, heat the EVOO and then add the anchovies and garlic. Stir the anchovies until they've melted completely. Discard the garlic when it starts to brown.
  • Drain the tuna and then plop it in the pan. Break it with a wooden spoon, trying to keep some larger chunks intact. The oil may splatter at this point; cover with a splatter screen for a few minutes.
  • Cook, stirring occasionally for a few minutes, or until the tuna bits get a little crispy. Add the oregano.
  • Once the pasta is cooked, stir it in the pan with the tuna, add a splash of EVOO and serve.

And since we're making pasta, let's refresh our basic pasta skills: