Showing posts with label Dolci. Show all posts

Tuesday, November 3, 2015

A TALE OF TWO TUSCAN RICE CAKES

Torta di riso alla Carrarina - Tuscan rice cake with rum and custard


My mom is visiting from Italy. Her presence has of course been a great help with my two children, but has also turned into an opportunity for me to rediscover old recipes–both from my childhood and from the land of my grandparents. My maternal grandfather was from a tiny town in the north of Tuscany called Montignoso, an adorable little place that I remember fondly for the cute-as-a-button farm behind my grandparents' house (bunnies everywhere) and the amazing food we got to eat everyday. My favorite memories concern a fantastically oily and delicious farinata (a simple triumph of chickpea flour and olive oil), the soft and sweet donuts filled with pastry cream called bomboloni, and the torta di riso alla Carrarina, a custardy rice cake infused with rum that I would savor in slow, meditative bites in a state of generalized gratefulness. 

It is this rice cake that my mother and I decided to prepare a few weeks ago. We used the recipe from our relatives in Tuscany and we set to work right away, following the original recipe to the letter in excited and deferential expectation. Two hours later we were both kneeling in complete awe before the most beautiful and perfumed cake we had ever baked in our lives. The top of the cake was perfectly caramelized, almost brûlée, and smelled of rum and lemon and vanilla like a mythical Arcadian paradise. We then tentatively tasted it, and there it was, the wonderful physical manifestation of my childhood's torta di riso in all of its starchy, custardy, and boozy glory. The rice worked as a soft crust, and above it was the perfectly firm custard that gently yielded to the pressure of our spoons. It was a complete success, with a touch of divine apparition.

But as much as this success made me proud, there is the dark side of this story. A week later, I decided to make the rice cake again for friends, and I had the gumption to add my "personal touch" by cutting the original amount of sugar and substituting rum with bourbon. I mixed the ingredients quickly, distractedly, arrogantly–leaving some unbroken lumps of egg white in the custard ("It'll work fine"), and threw the cake into the oven. When it finally came out, an unsettling feeling grabbed the pit of my stomach, telling me that the gods of Italian food had decided to punish my insolence. The surface was not as caramelized as the first time, and the lumps of egg white had solidified independently into an unappealing reminder of scrambled eggs. When I finally tasted the cake (in the company of my guests, no less), I had to admit to myself with great shame that the bourbon was almost undetectable, and that the lack of sugar had allowed the eggs to dominate in flavor. It was a half sweet, eggy frittata with a base of lumpy rice, a grotesque imitation that filled me with shame and my guests with useless cholesterol.

I apologized to my friends and family for the botched rice cake, and then closed myself into my confessional pantry—my altar to Italian food—and promised to never again take lazy initiatives with perfect Italian classics. No rash substitutions, no presumptuous subtractions, no distractions. Just humble, grateful respect. And you, reader, should do the same.

Read about another of my baking fails in Happy Easter, Bitter Memories.
Torta di riso alla Carrarina - Tuscan rice cake with rum and custard
A slice of the good torta di riso.

TORTA DI RISO ALLA CARRARINA


1/2 C short-grain white rice (Arborio or Carnaroli, but I used sushi rice and it worked fine)
5 eggs
1 1/4 C sugar + a tbsp for dusting the pan
1 tsp vanilla extract
1 lemon (zest and juice)
2 C whole milk
1/3 C rum
a pinch of salt

  • Cook the rice in 2 cups of lightly-salted water for no more than 10 minutes. Rice should be al dente. 
  • Drain the rice and let cool.
  • Preheat the oven to 350 F.
  • Butter a 10'' cake mold and dust it with sugar.
  • In a large bowl, mix together the eggs, sugar, lemon zest and juice, milk, and rum. Use a spoon for this, and make sure all of the egg white is broken to avoid a scrambled-egg top (no big lumps, just very small patches).
  • Add the rice to the mix. It will be very liquid.
  • Pour the mixture into the cake mold.
  • Carefully transfer the cake into the oven, and bake for one hour, or until custard has set and looks brûlée like in the picture above (do not skip the browning!). If you're using a glass mold, it will take you up to 90 minutes.
Serve cake lukewarm or at room temperature, or the next day (it really shines after resting for a bit).

Tuesday, October 20, 2015

TRIXIE CAKE (INSPIRED BY A TRUE PITBULL)


Up until five years ago, there was only one baby in my life, and she was cuddled and adored beyond imagination. I had hundreds of pictures of her in my phone, I would cry when I had to leave her home during my Italian trips, and I made sure she was raised a classy lady, exposed to the best Italian cheeses. Mr Bee and I nicknamed her "Most-Kissed Dog", and one night I even got on my knees and asked her to marry me. That baby is now 7 years old, and her name is Trixie: She's my crazy pitbull mix.

After the birth of my two boys, the level of attention that Trixie was used to plummeted in a way that I'm not proud of (I'm not going to bore you with details, but my sentiments are perfectly expressed by this spot-on apology by The Ugly Volvo). Nonetheless, Trixie will always have a huge and special place in my heart that I want to celebrate today.

Trixie is the most hyper and affectionate dog you'll ever encounter, a canine tornado of love whose only goal in life is to French kiss all of our guests. Once she calms down from her bursts of PDA (it might take hours with our dog-loving friends), she will curl up into a ball right next to you, wagging her tail every now and then to show you that her love is real. And given my food-centric view of the world, the first time I saw her curl up to sleep, the only thing I could think of is that she looked like the most amazing marble bundt cake.

The "donut" position gets tighter in winter.
I started researching recipes to replicate Trixie's beautiful, dark brindle coat as closely as possible, and that's when I found that I could get pretty close with a standard marble cake, including one that used used cocoa and apple butter. However, I wanted a more distinctive flavor, so I replaced the apple butter with pumpkin butter, and then reworked the amounts of butter, sugar, and yogurt so that the cake would be rich and sugary to my taste (universal tip: more butter, less sugar). I then doubled the amounts to make a bundt cake. 

After several attempts, I can say that my current Trixie Cake is perfect: a soft, fragrant cake that all of the talking men in my house have on permanent request for birthdays, holidays, Sundays... you get the idea. The pumpkin butter really comes through and pairs very nicely with the cocoa, and the yogurt makes it moist and soft as I like it. The visual effect is a perfect representation of Trixie's brindle coat, with reddish and dark brown layers rolling together into crumbly ribbons. It's such a pretty cake in her unassuming simplicity, and I almost feel bad cutting it: She looks so cute when she sleeps.


TRIXIE CAKE


3 1/2 C all-purpose flour
2 tsp baking powder
2 tsp baking soda
1/2 tsp salt
1 tsp cinnamon
1 1/2 C sugar
2 sticks of butter, at room temperature
2 C plain yogurt (no-fat works fine)
4 eggs
2 tsp vanilla extract
juice from half a lemon
1/3 C pumpkin butter (for a change of flavor, pear butter is the best alternative)
4 tsp powdered cocoa

Utensils: Bundt cake mold
  • Preheat oven to 350F degrees. Butter and flour the cake mold.
  • In a large bowl, mix together the flour, baking powder, baking soda, salt, cinnamon, and sugar.
  • Mix in the butter in small pieces, and then pour in 1C of yogurt until mixture comes together but is still very lumpy.
  • In another large bowl, mix together the eggs, vanilla, lemon juice, pumpkin butter, and the rest of the yogurt until well combined.
  • Add the wet mixture to the flour mixture in 2 or 3 batches, mixing until just combined.
  • Transfer half of the resulting batter in the bowl that is now empty, and then mix in the cocoa until well combined.
  • Pour the chocolate batter into the other batter, stirring with a spatula just a few times in order to create a marbling effect.
  • Pour the final batter into the cake mold, and place in the oven for 50 minutes, or until a toothpick inserted in the thickest part of the cake comes out clean.
Very important: Trixie Cake is best served with a dollop of whipped cream to reprise the white marking Trixie has on her chest—and the whipped cream might or might not be spiked with bourbon according to whom is going to eat it.

And here's another shot of Trixie, because you deserve it.

Wednesday, September 2, 2015

FIGS ARE HERE ☞ FRESH FIG AND OLIVE OIL CAKE

Fresh fig and extra-virgin olive oil cake

I love the end of summer for a variety of reasons: Days are getting cooler, the sun is not slapping me in the face at every occasion, the kids are back at school, people have stopped asking me to go to the pool (it's not happening—way too much work), and mosquitoes seem less ferocious after two months of vampirism. My favorite season, fall, is peeking at me from the end of September with its lovely smile, and I feel happy. To make things even better, my favorite fruit has come back to me: Oh juicy, sweet fig, welcome back to my supermarket shelves! I'd plant a tree for you in a heartbeat, but I don't want to share you with my neighborhood rats.

To celebrate, I decided to work my beloved figs into yet another recipe. I looked inside my pantry, and was reminded of a 5-gallon tank of family produced extra-virgin olive oil that my father brought over from Italy, so I thought about a fresh fig and olive oil cake. Perfectly Mediterranean, and perfect for the cool days of summer's end. I used this recipe for a Rustic Olive Oil Cake with Honey Syrup from Serious Eats as a base cake, and made a few modifications. Namely, I cut the sugar amount in half and counted on the fig to provide most of the sweetness. And no Grand Marnier, just Meyer lemons. Finally, I replaced the milk with plain kefir, which worked brilliantly and delivered a fantastic moistness to the cake.

And about this, always (ALWAYS) add yogurt or kefir to your cakes. I've been doing this for almost 20 years now because it works wonderfully in keeping your cakes moist and soft. Did I just say 20 years? How is that even possible?!? Did I really start not only making desserts but willfully tweaking recipes that long ago? I'm shocked. Better have a slice of fig cake to calm myself down.

And if you need more figs ideas, check these old posts:

FIGS ARE HERE ☞ FIG TART
FIGS ARE HERE ☞ ROASTED FIGS

Fresh fig and extra-virgin olive oil cake.

FRESH FIG AND OLIVE OIL CAKE


2 C all-purpose flour
1/2 tsp baking powder
1/2 tsp baking soda
1 tsp kosher salt
1 1/4 C plain kefir (or 1 C milk and 1/4 C plain yogurt)
2 Meyer lemons (for juice and zest)
3 eggs
1 C sugar
1 C EVOO
10-12 figs or whatever you have or it takes, halved 
powdered cocoa
  • Heat the oven to 375 degrees.
  • Line a 9'' round cake mold with parchment paper. 
  • In a large bowl, stir the flour with the baking powder, baking soda, and salt.
  • In a smaller bowl, mix the kefir with the juice of the Meyer lemons, and then stir in the zest from one of them.
  • In yet another small bowl, whisk together the eggs and the sugar, and then slowly pour in the EVOO, whisking constantly.
  • Add the contents of the two smaller bowls to the dry ingredient, in batches. 
  • Stir in until combined.
  • Pour the batter into the cake mold, and the top with the halved figs.
  • Back from about 50-60 minutes, or until the cake appears lightly browned on the top, and a toothpick inserted in the middle comes out clean.
  • Dust cake with powdered cocoa.
Best served at room temperature or warm.

Wednesday, June 24, 2015

STRAWBERRY RICE TORTE

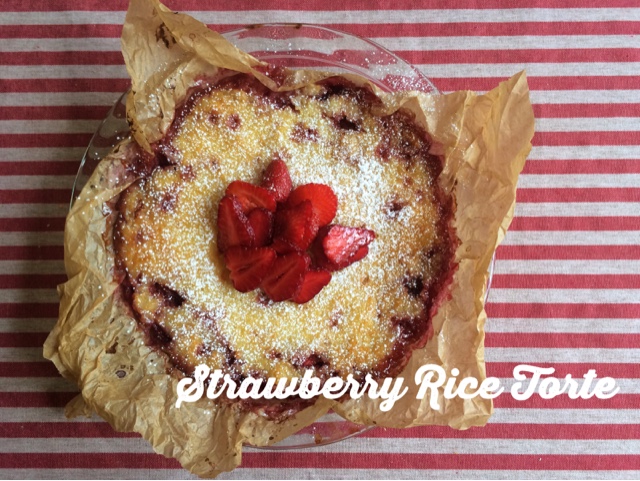
Strawberry Rice Torte, or rice pie with strawberries.

I love spring because my CSA starts again, rescuing me from a winter of badly-planned grocery shopping where I fill my house with too many cabbages destined to be forgotten in the back of the fridge. I always have grandiose plans for my cabbages, plans I promptly forget when I need them, as if they were only beautiful dreams from the deepest of sleeps. But I digress... Back to my CSA. This week, I bought a pint of pulpy strawberries that looked and tasted too good to be wasted on my kids' afternoon snack. (It's not that my kids don't deserve good strawberries, but the afternoon is usually a time of angry screaming and hurled toys, so rock-hard pears would do just fine. Am I digressing again?) I thought about it for a while, and I remembered the recipe for Strawberry Risotto that I had so loved in my childhood. I probably had it only twice then, but I tried it again a few years ago and found it lovely.

I thought that recipe for Strawberry Risotto would be perfect for the blog, so I started researching its origin to give you, my dear readers, some damn culture. As I started my Web browsing, I was already beginning to imagine an adorable alpine village in the north of Italy, nestled in the middle of a perfumed grazing pasture and animated by colorful wildflowers waving in the breeze. There, a small group of stern but kind matrons would throw handfuls of fragrant wild strawberries in a rice cauldron, stirring the Risotto with their massive wooden spoons around and around... Sadly, my Italian daydreaming was stopped short. My research immediately revealed that Strawberry Risotto was not an ancient Italian tradition. In fact, it's nothing but A FANCY RECIPE FROM THE 70s, a self-satisfied gimmick of a culinary period that thought itself above history and taste, and possibly the Italian equivalent of this Chicken Fricasee. My bucolic fantasy was shattered. I saw the wildflowers wilt with a cracking sound, and adorable black-and-white cows stampede all over my imaginary matrons and their northern village. A cloud of hairspray engulfed the land, and massive vol-au-vents began hailing all around me. Then everything turned glossy, and I passed out.

Well, not really. I find 70s food amusing, actually, but this time I wasn't interested, so I decided to employ my strawberries in a different direction. I still liked the idea of rice and strawberries, and so I researched a dessert that would use them both. I found this recipe for Torta di Riso al Balsamico con Fragole, which is fancier than my adaptation here given its inclusion of balsamic vinegar, but whatever. What I did was a very simple sushi rice cooked in milk and then mixed with sugar, egg, and a little rum. I spooned the mix into a cake pan in two batches, so that I could have a layer of sliced strawberries in the middle. The result is a simple, pretty cake that is the emblem of spring. It is light and delicious, and perfect for a picnic. And, in case you need it, it's also gluten-free.

Garnish it with good fresh strawberries, if you have them, and eat it warm, or at room temperature, or cold. And let's forget that the 70s are back.

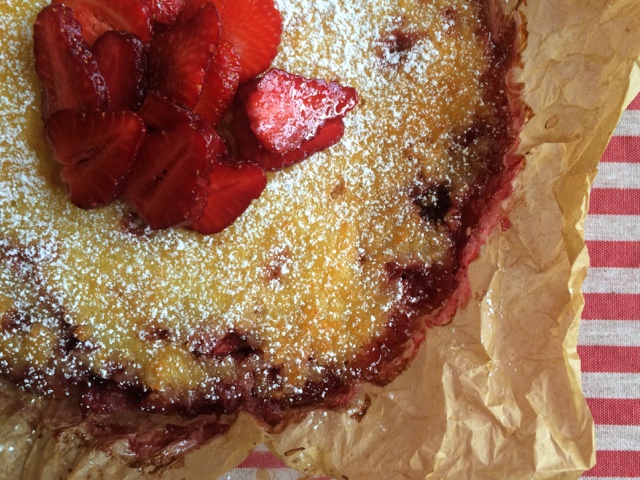
Strawberry Rice Torte, or rice pie with strawberries.

STRAWBERRY RICE TORTE


3 C milk
1 1/2 C sushi rice (or other short-grain starchy rice like Arborio)
1 C sugar
6 tbsp unsalted butter at room temperature
3 eggs
1 tsp vanilla
3 tbsp rum
1 Pint of strawberries (half for the filling, half or less for topping or accompaniment)
  • Heat the oven to 350 degrees.
  • Cook the rice in milk on the stove until cooked through, then transfer to a large bowl and allow to cool down.
  • While the rice cooks, wash and slice half of the strawberries.
  • Stir in the butter (broken in little pieces), the eggs, the vanilla, and the rum.
  • Line a 9'' round cake pan with parchment paper (or butter and flour the pan if you prefer), and pour half of the rice batter in.
  • Arrange the sliced strawberry in a single layer over the rice batter.
  • Pour the second half of the batter over the strawberries, then slide the cake pan in the oven for one hour, or until cake is firm and top is slightly golden.
Note to ramekin lovers: This recipe works great in individual ramekins as a spoon dessert. Just check the ramekins after 35 minutes for doneness. 

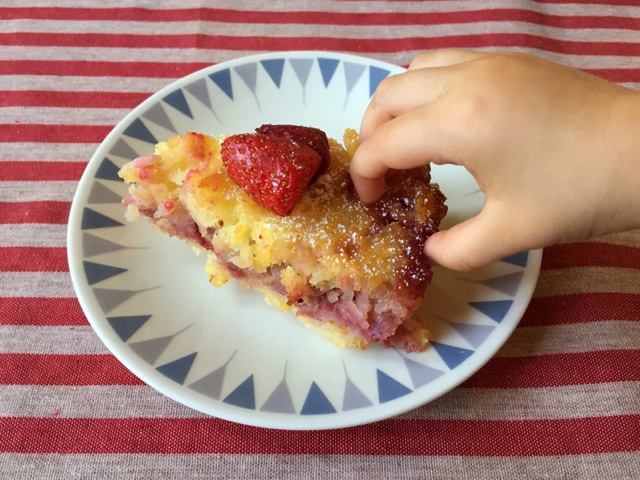
Slice of Strawberry Rice Torte, or rice pie with strawberries.
Microbee's unforgiving claw.

Wednesday, February 25, 2015

MATCHA CHOCOLATE CAKE

Detail of matcha chocolate cake dusted in cocoa powder and powdered sugar

My oldest son, MiniBee, turned four (!) a couple of weeks ago, an event that was celebrated with friends and with a deluge of Venice Carnival sweets and a two-batch Pandecocco coconut cake. A couple of days later, we also had a smaller family celebration that required yet another birthday cake. As any parent knows, children are only slightly more traditionalistic than the most conservative old-Europe grandparent, so there was no way MiniBee could hear the words "happy birthday" without blowing on proper candles on a proper cake. I needed a recipe, and I remembered one for Chocolate Matcha Bundt Cake from Bakerella (of the infamous cake pops) that had been sitting patiently on my Evernote for at least three years. I love matcha and I enjoyed it in many versions on my 2009 food pilgrimage to Japan, and I especially love how it couples lusciously with chocolate. It all started when a friend gave me an assortment of fancy chocolates that contained a matcha-chocolate combination that was one of the highlights of my life as an eater.

Now, someone could argue that matcha is a risky choice for a preschooler's birthday cake, and I can definitely tell you that when MiniBee heard his birthday cake was made with TEA, he was not at all pleased. But, in rebuttal to any concerns and objections I have two points to make:

1. Children will eat any cake that's placed in front of them, especially when decorated with birthday candles.

2. It doesn't matter whose birthday is it: If I'm baking or buying a cake, I need to like it first.

The second point is actually a corollary of my favorite parenting rule:


Substitute "wear" with "eat" and "oxygen mask" with "damn cake" and you'll see what I mean.

But back to matcha. For the cake, I used some unsweetened matcha powder I bought at HMart. And since the party was attended only by five people, I decided against the Bundt format and made a simple layer cake instead, halving the ingredients and making a couple of variations (more egg, less sugar, and my trusted addition of plain yogurt to guarantee a moist texture). I also suspect the matcha-chocolate combination works best in a slimmer cake. What can I say? I think it's classier this way. And as someone who wears German slippers all year round and whose every food contains 15% dog hair, let me tell you: I KNOW CLASS.

The final matcha chocolate cake was delicious, sweet and grassy and elegant (disclaimer: see my standards above), and perfect to be enjoyed with or without children.

Oh, if you wonder about MiniBee: He had two slices and was happy as a clam. And so was I.


MATCHA CHOCOLATE CAKE

Ingredients

Chocolate Mixture
3/4 cups all-purpose flour
1/4 cup baking cocoa powder
3/4 tsp baking powder
1/4 tsp salt

Matcha Mixture
3/4 cups all-purpose flour
1 1/2 tbsp unsweetened matcha
3/4 tsp baking powder
1/4 tsp salt

Wet Ingredients
1 C sugar
1 stick unsalted butter at room temperature
2 eggs
3/4 C milk
1/2 C yogurt
1/2 tsp vanilla

Directions

  • Preheat oven to 325 degrees.
  • Grease and flour a 9'' springform pan. You can also line it with parchment paper if you prefer.
  • In a small bowl, whisk together the ingredients for the chocolate mixture.
  • In another small bowl, whisk together the ingredients for the matcha mixture.
  • In yet another bowl, cream the butter and sugar with an electric mixer, then add the rest of the wet ingredients.
  • Divide the wet ingredients evenly between the two flour mixtures, stirring until combined.
  • Pour the two mixtures into the pan. Bakerella suggests doing this in tablespoons to maintain the two colors vibrant. I poured half mixture at a time and then swirled them with my finger.
  • Bake for 45–50 minutes, or until a toothpick inserted in the center comes out clean.
  • Let rest of 10 minutes and dust with cocoa powder and powdered sugar.


Tuesday, February 17, 2015

VENICE CARNIVAL: FRITTELLE & GALANI

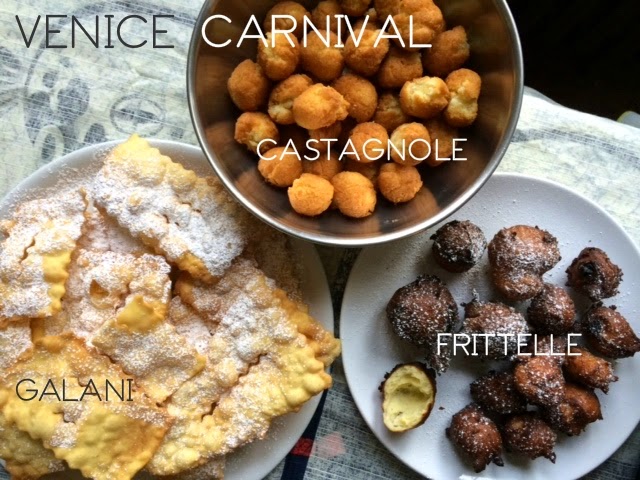
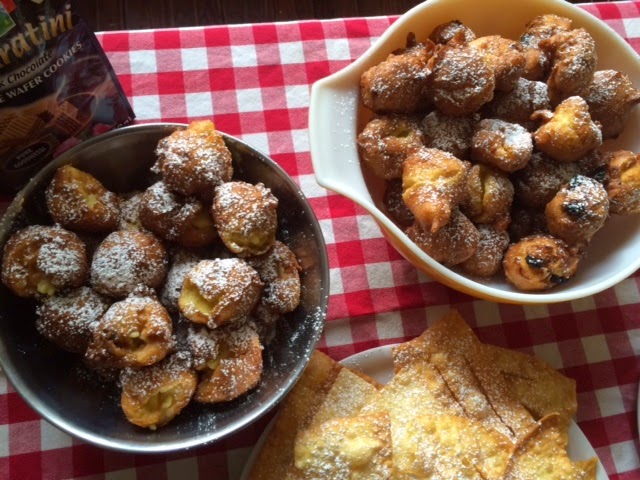
Trays with sweets typical of Venice Carnival: Frittelle, Galani e Castagnole
Today is Mardi Gras, which is the day of the year I traditionally spend sobbing in my pajamas because of homesickness. The reason? In Venice, today is the end of Carnevale ("Carnival" in English, if you seriously need a translation), my favorite celebration of all, and the one I miss the most since I've moved to the United States. Venice Carnival has been synonymous with great fun and great food since I was born. As a little girl, the fun consisted of wearing my chosen costume on multiple occasions—Venice Carnival lasts a little over two weeks—at school, on strolls around my town or in Venice, and at children's birthday parties. During each outing, us kids were allowed to throw confetti in each other's eyes and then litter the streets with colorful serpentine throws. To make things even more interesting, the right princess or pirate costume could grant you multiple fiancés by the age of 9. As a teenager and then young adult, the fun was pretty much the same, but it happened at night and was quite a bit boozier.

Now let's talk about the food. During Carnival, bakeries and pastry shops in Venice and the rest of the Veneto region start churning out an avalanche of amazing fried sweets, namely frittelle, galani, and castagnole. Venetians of all ages stuff their faces with these beloved sweets at all hours of the day. Let's see them in detail:

  • Frittelle are little sweet and soft doughnuts with raisins and pine nuts and sometimes filled with crema pasticcera (pastry cream) or zabaione, and dusted in granulated or powdered sugar. They are the Holy Grail of Venice Carnival foods.
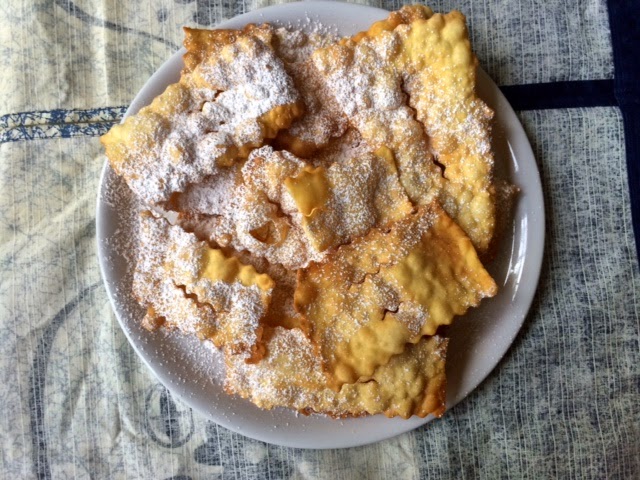
  • Galani are paper-thin rectangles of lightly sweetened dough, deep-fried and dusted with powdered sugar.
  • Castagnole are small round fried cookies very similar to shortbread. For some reason, they are the least popular among Carnival sweets, even though they are completely delicious in their own right. I am afraid they are unfairly obscured by their high-performing cousins (a phenomenon I will now call "Unfair Eclipse Syndrome").

To lessen my desperate homesickness and to share a little of the joy of Venice Carnival with my insatiable children, a couple of years ago Mr Bee and I started to make all these sweets at home with acceptable results. This year, however, we knocked one out of the proverbial ballpark by finally landing two perfect recipes for frittelle and galani that I want to share with you today. Get a Carnival mask on, hang some streamers around your house, gather friends and love interests, and deep-fry these gems: This is the closest you're going to get to my beloved Venice Carnival.

You can read more information about the history of Venice Carnival in this post I wrote for Multicultural Kid Blogs

Venetian Carival Frittelle, with and without custard filling

FRITTELLE WITH CREMA

Makes 20–25 frittelle. Just remember crema is optional: Frittelle are amazing on their own.
Ingredients for crema pasticcera (pastry cream)
1/2 quart of milk (I would not use non-fat here)
lemon rind of half a lemon, cut in one piece (use a vegetable peeler)
4 egg yolks
1/2 cup sugar
1/4 cup cornstarch

Ingredients for frittelle

oil for frying
1 ¼ cups water
pinch of salt
4 tbsp unsalted butter
2 tbsp sugar (that's right)
1 ½ cups flour
6 eggs
orange rind (grated)
2 tsp vanilla extract
½ cup raisins
¼ pine nuts
oil for frying
granulated or powdered sugar for coating


Directions

Make the crema pasticcera
  • Pour the milk in a saucepan, add the lemon rind, and bring to a boil. Turn the heat off and let rest for 10 minutes.
  • In a bowl, whisk the egg yolk with the sugar together until pale yellow and fluffy.
  • Add the cornstarch to the egg mixture and stir together.
  • Remove the lemon rind from the milk, and pour the milk slowly into the egg mixture, stirring to prevent clumps.
  • Pour the mixture back into the saucepan and let it thicken on low-medium heat until it reaches a creamy consistency. The crema will continue to thicken, so leave it somewhat runny.
  • Let the crema cool down before using.

Make the frittelle
  • Place water, butter, salt, and sugar in a small pan and bring to a boil.
  • Add all the flour all at once and stir vigorously until the mixture pulls away from the sides of the pan to form a ball. This takes less than a minute.
  • Let the dough cool, then add one egg at a time. Make sure each egg is incorporated into the dough before adding another one. (I’d use a electric mixer here, if possible. Unless you enjoy the arm workout, of course.)
  • Mix in the the rest of the ingredients.
  • Heat oil to 370F degrees and fry the dough in small balls (use two spoons) for 5–6 minutes, or until golden brown and cooked throughout. Note that frittelle will first puff a little and then puff up even more after a couple of minutes of more.
  • Roll frittelle into granulated sugar or dust with powdered sugar.
  • When cool, fill the frittelle with about a tablespoon of crema pasticcera each, depending on size. I used a whipped-cream syringe similar to this one but way crappier. If you don't have a syringe, I guess that you can cut the frittelle open and fill them with a tablespoon of cream.
*The usual optimal frying temperature is 375F, but that cooked our dough too quickly so it was burned on the outside and still raw on the inside. Five degrees made all the difference!

A tray filled with Venetian Carnival Galani


GALANI
Ingredients

oil for frying

4 eggs
4 cups flour
2 tbsp butter, softened
1/2 cup sugar
1 cup sparkling water
grated lemon rind from one lemon
a pinch of salt
2 tbsp grappa (optional)
2 tsp vanilla extract

Directions


  • Mix the flour, sugar, and butter together until coarsely combined. You might want to use an electric mixer for this part, otherwise use your hands and be quick.
  • Add the eggs, lemon rind, and salt, Grappa and vanilla and mix.
  • Add sparkling water as needed and a little at a time until the dough becomes soft and stretchy. It should resemble fresh pasta dough, if that helps.
  • Cover the dough and let it rest for an hour.
  • Roll out the dough with a roller (champion) or with a pasta machine, going up to the smallest setting so that galani are paper-thin. If you've never used a pasta machine before, check out these instructions.
  • Cut dough into large rectangles with a pasta cutter. (Parents of young children: I couldn't find mine once so I used a Play-doh cutter.) Rectangles should be about 2x4'', but can be VERY irregular, so don't worry too much about it. 
  • Place rectangles on a floured kitchen towel.
  • Fry the galani in 375 degree oil for a few seconds, or until slightly colored and puffed up. 
  • Let rest on paper towels and dust with powdered sugar. Galani last beautifully for 2–3 days in a dry climate.


Tuesday, November 11, 2014

NOVEMBER 11: DOLCE DI SAN MARTINO

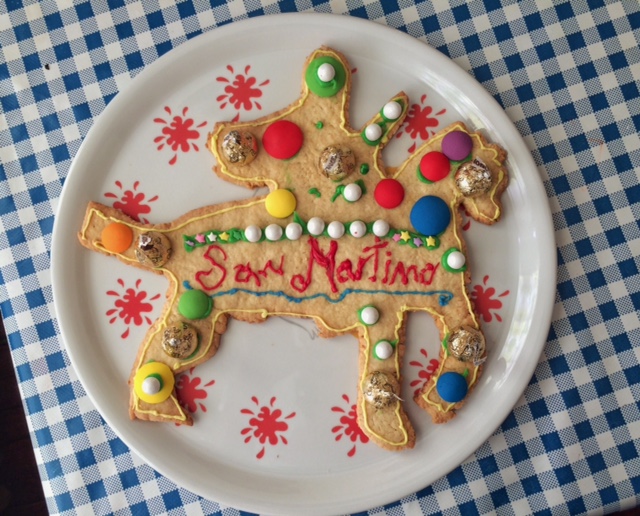
Dolce di San Martino, a Venetian traditional giant cookie
As you can see, pastry lettering is not my forte. 
One of the greatest challenges and joys of being an expat parent is keeping up with traditions from home. The challenge comes especially when my Venetian calendar demands a specific sweet to be consumed on a specific date, and I realize I have to f*cking make it myself since there are no Venetian bakeries from where I could just purchase said traditional sweet (remember Easter?). Well, today is San Martino (Saint Martin), a strictly Venetian holiday that is celebrated with the Dolce di San Martino, a gigantic cookie covered in candy and shaped like a knight riding a horse. The cookie shape is inspired by the legend of San Martino. Children, gather round and listen.

It was a horribly cold and windy November 11 many centuries ago, and Martin was riding on his horse, shrouded in a warm cloak lined in sheep wool. Along the muddy way, he encountered a poor old beggar covered in rags. So Martin got off his horse, cut his cloak in half with his sword, and shared it with the old beggar. As Martin rode on, the cold wind subsided, the clouds dissipated, and the day became warm and sunny. And that was the beginning of the so-called "Summer of San Martino", or the handful of warm and sunny days that often grace our early Novembers.

It is not clear how San Martino's act of charity became linked with the traditional decadent mega-cookie, but as a child I didn't question (and, truth be told, I don't really care even today). I loved unwrapping my Dolce di San Martino and breaking off a limb from the Saint or his horse to eat in perfect merriment. That was the extent of my celebration, but you have to know that traditionally children also walk around Venice banging on pots and pans demanding money or candy while singing an adorable song that ends with the curse THAT YOUR PIG MAY DIE if you don't give them anything—I guess it's still cute as long as they haven't joined a gang yet.

Today, I want my children to experience the same joy, so I made my own Dolce di San Martino. I traced down the outline from the web (straight from the monitor, because drawing is another of my non-skills), applied it on a sheet of 1/4''-thick shortbread dough, cut along the outlines, and then baked knight and horse for 20 minutes. Then, under the enchanted gaze of my oldest child, I decorated with cheap colored icing and chocolate chips. And for today, my job as a Northern Italian mother is done.

Check out a fancy Dolce di San Martino here.

DOLCE DI SAN MARTINO


2 C all-purpose flour

1/3 C sugar
3/4 tbsp baking powder
1/2 tsp salt
zest from one lemon
1 stick of COLD unsalted butter (in chunks)
2 large eggs

BEST IF MADE THE NIGHT BEFORE!
  • Draw and cut out the outline of the San Martino on a piece of cardboard or construction paper. I used this one
  • Heat oven to 350F.
  • With an electric mixer, mix together the dry ingredients.
  • Add the lemon zest, the butter, and the two eggs and mix together until they come together in a ball.
  • Wrap in plastic and refrigerate for 30 minutes.
  • Roll out the dough on parchment paper to a 1/4'' thickness, and cut out the San Martino using your cardboard outline.
  • Transfer the San Martino with the parchment paper on a cookie sheet and bake for 20 minutes, or until it just starts to brown around the edges and the center is just firm.
  • Let the cookie cool down, then decorate with icing and candy. You should definitely use icing to glue chocolates still in their wrapping (see here). I didn't have any and I regret not buying them.

Monday, September 15, 2014

FIGS ARE HERE ☞ ROASTED FIGS

Do you still have figs around? If you do, I applaud your restraint for not having eaten them yet. It took a massive effort in self control for me to store a dozen figs in order to make this second fig recipe of the month (find the first one here or just scroll down to see my previous post). Since this summer is being especially gracious with its temperature, I turned the oven on and did some roasting. FIG ROASTING.

Out of the oven.

Now, if there is one cookbook I find myself recommending again and again is All About Roasting by Molly Stevens (gifted to me by my incredibly intuitive husband a couple of years ago). It's a wonderfully informative book that explains the science and beauty of roasting and then provides very reliable basic and also sophisticated recipes to roast meat, fish, vegetables, and fruit. The recipe that struck me like a divine and life-changing apparition was this "Orange-Scented Honey-Roasted Figs". I followed the light.

So here they are, a panful of figs drenched in orange juice and honey and then sprinkled with black pepper. They come out perfectly caramelized and spicy, while retaining some of their chewiness. The pan juices, red and sticky, are a delight.

I served the figs with vanilla ice-cream, which is the most obvious choice, but I still have two children under four and I'm lazy, so I'll work on something more interesting next time. (I was thinking about a polenta dessert.) What I would like to try is swapping the orange juice with wine, perhaps a Grecante I once found at The Italian Store. I'll let you know what happens.

On ice-cream.

You can find the original recipe in All About Roasting, otherwise this one from Bon Appétit should do.

Thursday, September 4, 2014

FIGS ARE HERE ☞ FIG TART


I'm just going to come out and say it. I don't care much about fruit. In fact, if I didn't have children, I would probably never buy it. Does that make me a monster? Yes, it does. So what.

There is one fierce exception to my indifference to fruit: Figs. I love figs and I could eat dozens at a time. They are beautiful, they are sweet, they are luscious, and they bring me back to blissful childhood afternoons, sitting on a fig tree branch with a couple of friends and gorging on the fruits. Interestingly, the fig is one fruit whose seasonality seems to be respected both in Italy and the United States. You find it just twice a year, at the beginning and at the end of the summer. Italian figs are usually bigger, with a thicker skin that can be easily peeled off.

Come to me, my darlings!

You can only imagine my joy when I found a recipe for a "Brown Butter Fig Tart" in John Besh's My New Orleans: The Cookbook, a wonderful book I found at my father-in-law's during a winter visit (a great review here). I immediately copied the recipe on a piece of paper, and then sat on it for months until figs became available.

An empty center. That's what I get for eating half a dozen figs while halving them.

The tart is easy to make, and the result is rather paradisiac (of course). Since the tart is baked for only 40 minutes, the figs maintain their shape and some of their bite. They are also folded into the most delicious custard. And if you're lucky like I am, you have also a secret killer recipe for the perfect pie dough, perhaps with cream cheese. *winks*

The cocoa trick.

The tart you see in the picture was slightly overcooked, so a little too brown on top. To mask my mistake, I sprinkled a little cocoa powder, which is the only deviation from John Besh's recipe. I have to say, the cocoa worked perfectly with the figs and the custard, so I will definitely make it part of future preparations. And if you don't have figs, and like me have fruit in the fridge that you're not going to eat, please know this tart works great with plums and peaches, too.

Find the recipe here.

Monday, June 2, 2014

1/2 CUP SUGAR: CORNMEAL COOKIES OR ZAETI


You might remember that my family is now basically sugar-free thanks to Dr. Lustig and his anti-sugar campaign (YEAH, THANKS). I say "basically", because we still want to make room for the occasional treat, such as an unmissable dessert at a good restaurant, a cup of fresh gelato, or a homemade sweet that is as fun to make as it is to eat. We try to break The Rule a couple of times a month, and then we make sure to flog ourselves with a cat o' nine licorice ribbons.


In this regard, Italian sweets have become a perfect solution, since many of them tend to rely on less sugar than the American ones. In fact, I found that many recipes rely on 1/2 cup sugar, and that includes cakes. Mind you, these do not originate as healthy sweets: They are genuine recipes with no claim other than deliciousness. So here starts my 1/2 CUP of SUGAR series, for sweets that still need to be consumed in moderation, but should not hurl you and your family into leptin annihilation. (For this last comment, refer to Dr. Lustig's Youtube lecture linked above.)

The first recipe is for Zaeti (or Zaleti), the traditional Venetian cornmeal cookie. They are rustic and crumbly, like a hearty shortbread. They contain raisins, but sometimes also pine-nuts. I know them mostly shaped like diamonds—or to be more precise, like rhomboids—but they can be flat and round, or plump and oval. I made them both with coarsely-ground cornmeal and with finer one. I must say I prefer them on the coarser side, but medium-coarseness will leave some hard corn bits. Readers with dental crowns and fillings: Watch out.

Venetians usually have Zaeti in the afternoon, accompanied by a sip of white wine, but I'm not one to put limitations on their consumption. So if you prefer to stuff some in a paper cup and eat them in the car on your way to work, you have my blessing.

The powdered sugar is not really supposed to be there. Oh well.

Zaeti

3/4 cup of raisins
3 egg yolks
1/2 cup sugar
1 1/4 cup all-purpose flour
1 1/4 cup cornmeal
a pinch of salt
a pinch of baking powder
a pinch of grated lemon zest
1 tsp vanilla extract
10 tbsp unsalted butter, melted
powdered sugar (optional)

  • Heat the oven to 350F.
  • Soak the raisins in a little warm water for 10 to 15 minutes. Drain them and squeeze out the excess water.
  • In a small bowl, beat the egg yolks with the sugar until mixture has thickened and is a very pale yellow.
  • In another bowl, mix flour, cornmeal, salt, baking powder, and lemon zest. Add the melted butter and the vanilla extract to the flour mixture and stir well.
  • Pour the eggs and sugar into the flour mixture, together with the raisins. The final dough with be very coarse and wet. 
  • Roll the dough carefully on a floured surface, adding more flour if necessary, to a 1/4'' thickness. If the dough seems too crumbly, you can add a little bit of yogurt to make it more manageable. Let the dough rest in the fridge for 30 minutes.
  • Cut the dough into long 2'' stips, then cut the strips diagonally every 2 1/2 inch or so to make little diamonds.
  • Transfer them to a cookie sheet covered with parchment paper and then into the oven for 12–13 minutes, or until they start to color and they are not soft in the center. Let the Zaeti cool down for 15 minutes before serving them. Sprinkle them with powdered sugar if you prefer or if they don't look as you expected.


Sunday, April 20, 2014

HAPPY EASTER, BITTER MEMORIES

Easter 2007. Bold times.
Today is Easter, my favorite food holiday in Italy, which is surprising since my family must have celebrated it perhaps 3 times total. During Easter time, Italy is inundated with wonderful desserts such as chocolate eggs (hiding gifts!) and my favorite traditional cake, the colomba pasquale, or "Easter dove", a sweet and wonderfully soft bread sprinkled with candied citrus and topped with sugar and almonds. Colomba is not easy to find here, so you can only imagine I much I missed it, especially in my first years as an expat.


In 2007, emboldened by the small group of accolades Italian Dead Chef had, I decided to make my own colomba for Easter. I found a recipe from a reputable-looking blog that required about a day's work and 5 rises for the dough. All bakers out there know this was a Masterchef's endeavour, but I was blinded by the Vuitton-style paper mold I had found at Sur La Table, and I felt invincible.

As you can see from the picture, my colomba came out really pretty, and the sugar topping was perfect. Unfortunately, those were its only qualities.

The first sign that something was wrong was that my freshly-baked colomba was a little heavier than I expected. In fact, it weighed like a stuffed Thanksgiving turkey. It also emanated an extremely pungent whiff of yeast, evidently used in mindless abundance. The taste? My colomba was gummy and wet, bitter and alcoholic: completely and inexorably unedible.

I threw the colomba away and ran out to find a substitute. For the following three days, my colomba laid at the bottom of my trash can, together with the egg shells, the empty bags of roasted almonds, and the empty packets of organic pastry flour. With all that yeast, I was afraid it might resuscitate. You never know with these Christian holidays.

BLOGPOST SOUNDTRACK

If you're one of the very few people who likes to listen to music while perusing websites, here is a choice song that goes with this Easter post. The song is "Vola colomba" ("Fly, Dove") and was a massive hit in 1952. My parents, who were innocent children when this song was released, will run hiding under the couch if they hear this, but I can safely listen to it ironically from the safe distance of two generations removed. Sing it, Nilla!

Wednesday, March 12, 2014

COCONUT MINICAKES? JUST CALL THEM PANDECOCCO


In this post, I'll put my pitch-perfect irony aside because I'll be reminiscing about my son as a 18-month-old, a wonderful time during which he was perfectly playful, agreeable, happy, and most importantly, so plump and round he could be easily drawn in 2D as a series of overlapping circles.

One of the first multisyllabic words my son pronounced was pandecocco. It is not a proper word, actually, but just some cute Italian-sounding gibberish that he loved to repeat over and over. Pandecocco sounds a lot like "pane di cocco," or coconut bread, but there's no way he meant that. I often asked him to point to a pandecocco around the house, and the closest explanation I got was him cheerfully pointing to the USB port on my laptop.

Months passed, and my son slowly stopped invoking pandecocco, but I remained intrigued... So intrigued I decided to bring this adorable nonsense into the real world in the form of a proper coconut bread. This would also serve as a trick to hear my son say "pandecocco" again and again into his preschool years and possibly until his voice changes. (Then I guess the magic will dissipate.)

Pandecocco became a coconut cake inspired by this Key Lime Coconut Cake by Gourmet. I made a few modifications to make it less sugary and super-quick to prepare (i.e. much less fancy, sorry). And then yesterday, I simply spooned  the dough into a muffin pan to have 12 little pandecocco to make my son's little head explode. Worked like a charm.

The resulting mini-cakes (I hesitate to call them cupcakes, although this is pretty much what they are... Also because that would confirm my fear that you cannot have a food blog without having cupcakes just show up at some point, which is a terrifying thought, really.)... Sorry, where was I? So, the resulting mini-cakes are very moist, fragrant, and not too sweet, and they will give you a whiff of summer in this very miserable end of winter 2014. Serve them for breakfast, for a snack, or even as a dessert. They were brought into this world by a toddler, so keep them playful.


PANDECOCCO

1 cup unsweetened shredded coconut
1 stick unsalted butter (softened)
1 cup sugar
1 tbps lemon extract
2 large eggs
1 3/4 cups flour
2 tsps baking powder
3/4 milk
1/4 cup plain yogurt
Extra-virgin olive oil (spray)

Equipment: small baking pan, non-stick 12-well muffin pan, electric hand mixer, mixing bowl.
  • Preheat oven to 350°F and spray the wells of the muffin pan with the extra-virgin olive oil.
  • Toast coconut in the oven using a baking sheet for about 8–12 min, or until golden. Be careful because it gets from golden to burnt very quickly.
  • Using an electric hand mixer with the dough attachments, beat together butter, sugar, and lemon extract until fluffy. Beat in eggs.
  • Using a wooden spoon, stir in flour, baking powder, and 1/2 of the toasted coconut. Stir in milk and yogurt. Dough should be lumpy.
  • Spoon batter into the muffin pan and sprinkle with the remaining shredded coconut.
  • Bake until golden and a wooden pick inserted in center comes out clean, 15–20 minutes.

Monday, January 6, 2014

THIS IS NOT A FRUITCAKE: LOISON @ THE SILVER SPORK

The holidays are over, and with them the grandiose dishes that celebrated them. This year, we roasted our first Christmas goose. So tasty, so beautiful, so expensive... A tragic love affair that won't be easy to shake off. If you see me strolling pensively along the beach this winter, you'll know what I am thinking about. Anyhoo, to counterbalance the poultry heartbreak, I'm happy to report that we scored some fantastic authentic Italian panettone and pandoro right here in DC just in time for Christmas. Mr Bee and I were going to Eastern Market to purchase the aforementioned goose (see? I can't stop talking about her!) when we saw that a window of The Silver Spork was decked from top to bottom with Loison panettoni, pandori e focacce veneziane.

You might wonder, what is Loison? Loison is a lovely brand from Vicenza, near Venice, that produces traditional baked goods that I'm excited to eat even in Italy. Their panettone is famously soft, buttery and fragrant; it comes in a lovely wrapping, and it's a mile above the usual industrial panettone from more common national brands like Bauli or Motta. Of course, the best panettone or pandoro should come fresh out of the oven of a local bakery or pastry shop, but since there are no such places here, Loison offers the best alternative.

Each of these breads costs about $20, which is not cheap, but still better than paying a small fortune for a lesser brands at The Italian Store or at Rodman's. Incidentally, I bought an Easter colomba at Rodman's one year: For $30 I got a cake that literally underwent instant mummification as soon as it came in contact with the Earth's atmosphere, so I was not eager to try their Italian Christmas selection.
Traditional Pandoro: A tower of butter covered in sugar.

So get a panettone or a pandoro if you still can. And you might want to try the Focaccia Veneziana, which is a sort of softer panettone without raisins nor candied fruits that is sold in the colder months in Veneto. I have to say, the Loison one doesn't have the traditional crunchy sugar&almond top of the original, but, my goodness, it's still so good.
Focaccia Veneziana. My favorite breakfast since 1976.