Showing posts with label Vegetarian. Show all posts

Wednesday, November 19, 2014

PUMPKIN RAVIOLI (MADE WITH CHESTNUT FLOUR)

Image of plated chestnut-flour pumpkin ravioli.
  
Here I am with a recipe that has been wiggling in my brain for months: pumpkin ravioli made with chestnut flour. I LOVE chestnut flour. I bought it for the first time a few years ago from The Italian Store, and I've used a few times to make linguine and crepes with great success. Chestnut flour has a mellow, sweet, nutty flavor that is subtle and unexpected. It produces a pasta dough that is tougher than the usual dough for egg pasta, but it also cooks very well and maintains a good bite, so it's worth every extra pound of pressure you need to apply to your rolling pin and pasta maker.

The pumpkin/chestnut idea became suddenly urgent when last month, on a whim, I bought a peanut pumpkin that a DeadChef follower and cooking expert later defined as "the MOST delicious pumpkin ever for pies and everything else". This is the kind of comment that gets me really excited, of course. Unfortunately, days passed and I couldn't get to my ravioli thanks (really, THANK YOU) to a string of unforeseen, disheartening sh*t, including Microbee (the youngest) getting sick and throwing the entire family into a weeklong nightmare of tears, snot, insomnia, and recrimination. When I finally judged myself ready for my peanut pumpkin, I realized with great horror that it had rotted from the inside and was completely inedible. To make things worse, my farmer's market was not selling them anymore. Which brings me to my new motto:

Image of motto, "Good things rot for those who wait".

I had to give up on the best pumpkin in the world, but I wasn't giving up on my ravioli vision.
So I immediately drove back to my farmer's market and purchased another pumpkin. This time, I chose a Long Island Cheese Pumpkin, because if I couldn't have the best, then I wanted another with a similarly evocative name. The Cheese Pumpkin didn't disappoint—well, it did disappoint in not tasting like actual cheese, but I knew the name was due to its shape—it is a more velvety and sweet version of a butternut squash, and decidedly more delicious. 

While the pumpkin was roasting in the oven, I worked on the chestnut-flour pasta dough, and then rolled it out, stretched it, filled it, and cut it despite the slightly unnerving attentions of my very defiant and mechanically-obsessed Minibee (the oldest).
Step-by-step ravioli making. Image of thinly-rolled pasta dough, dough with bits of filling, hands pressing dough on filling, hand using pasta cutter to shape ravioli.
The pasta cutter in the last pic belonged to my maternal grandma. It's my amulet.

I'm happy to report, the final ravioli were a total delight, sweet and creamy and absolutely perfect for fall. We served them topped with melted butter, grated Parmigiano, and a little black pepper, and added some leftover cheese pumpkin cubes aside. It took a whole afternoon with the constant sabotaging by my kids, but when there's a pot of buttery ravioli at the end of the parenting tunnel, nothing can stop me.
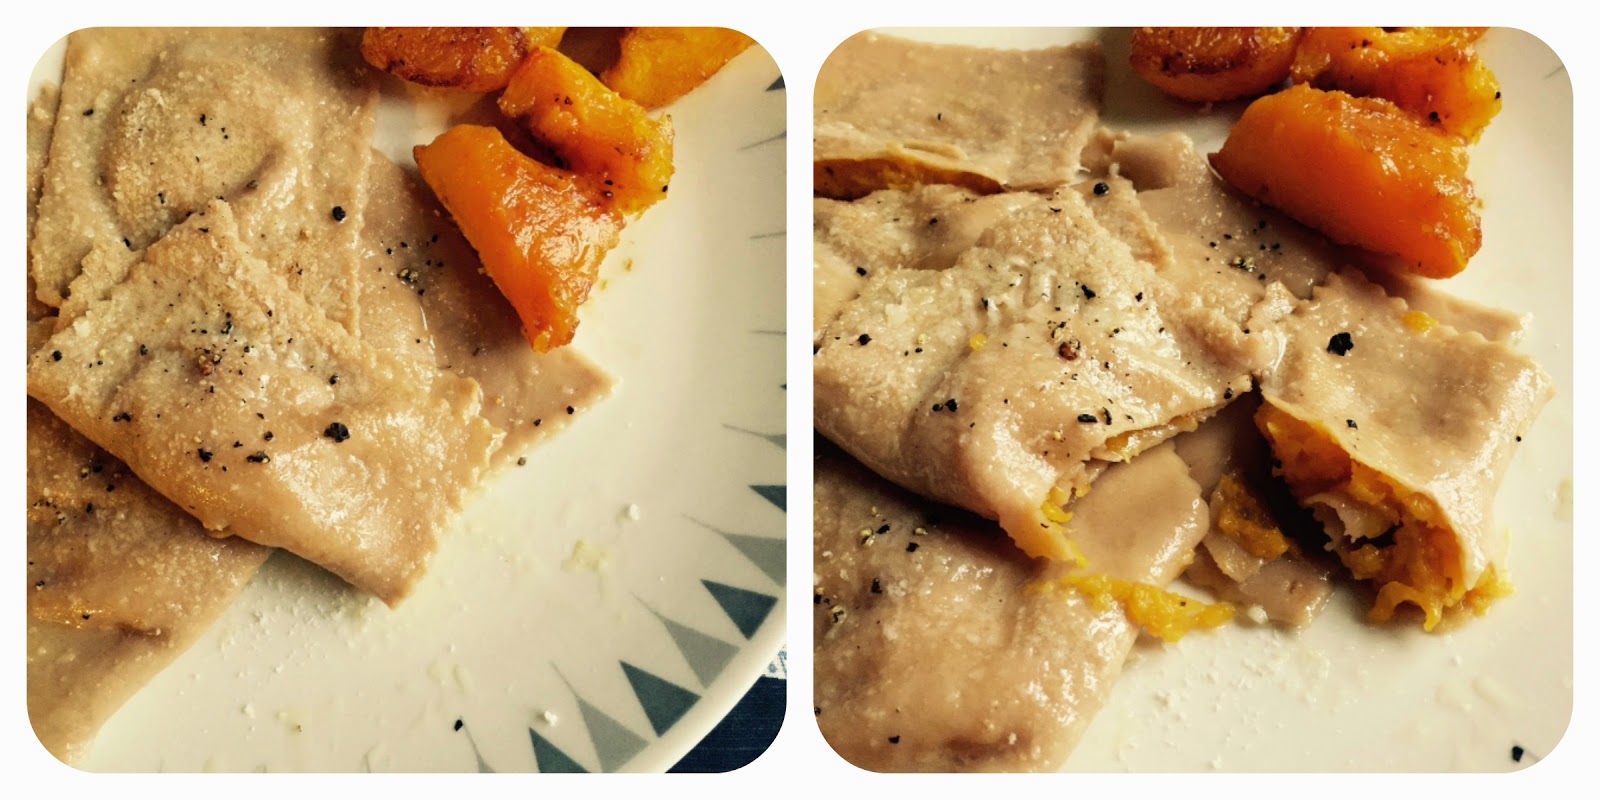
Two close-up of chestnut pumpkin ravioli. Second image shows open ravioli with filling oozing out.

PUMPKIN RAVIOLI 

(MADE WITH CHESTNUT FLOUR)


for the filling:

2C roasted pumpkin (with EVOO and kosher salt)
1/2C grated Parmigiano Reggiano
freshly ground black pepper

for the pasta:
1C chestnut flour

1C unbleached all-purpose flour
a pinch of salt
1 tbsp EVOO
2 eggs
1 egg white (for sealing the ravioli)

finish:
2 tbsp unsalted butter
1/4C grated Parmigiano
freshly ground black pepper

MAKE THE FILLING
  • Peel and cut your pumpkin in small pieces. Drizzle with oil, sprinkle with salt and roast in a 375F oven until fork tender. Let cool.
  • Mash the pumpkin with a potato masher if you like to keep some of the original texture (and heartiness), otherwise, puree until smooth in a food processor. 
  • Stir in the Parmigiano and the pepper.

MAKE THE PASTA DOUGH
  • Mix the two flours in a bowl and stir in the salt and EVOO.
  • Add the two eggs and mix first with a fork and then, when the dough starts to come together, with your hands, until you obtain a compact, elastic dough that is not sticky. If the dough is still dry and crumbly, sprinkle with water until you reach the desired consistency.
  • Cover and let rest of 30 minutes.

MAKE THE RAVIOLI
  • Roll out the dough with a rolling pin or with a pasta machine until very thin. If you never used a pasta machine before but want to start now, check out these instructions.
  • My ravioli were 3X3'', because I wanted to have a little filling in the center and some room for the pasta itself to breathe (you get to enjoy the chestnut flavor more). If you want the same, cut the pasta in 3'' wide strips and place a heaping teaspoon of filling every 3''.
  • Brush with egg white (mixed with a couple tablespoons of water) along the edges and in between the filling heaps.
  • Place another strip of pasta on top and cut the edges of each piece with a pasta cutter.
  • Place the finished ravioli on a floured kitchen towel and sprinkle with flour.

COOK&SERVE
  • Melt butter in a nonstick pan.
  • Cook the ravioli in gently boiling water for 2–3 minutes. Be delicate: they are.
  • Serve the ravioli, about 5 per portion, topped with melted butter, black pepper, and Parmigiano.

Monday, October 13, 2014

PIZZE FRITTE (DEEP-FRIED PIZZAS)

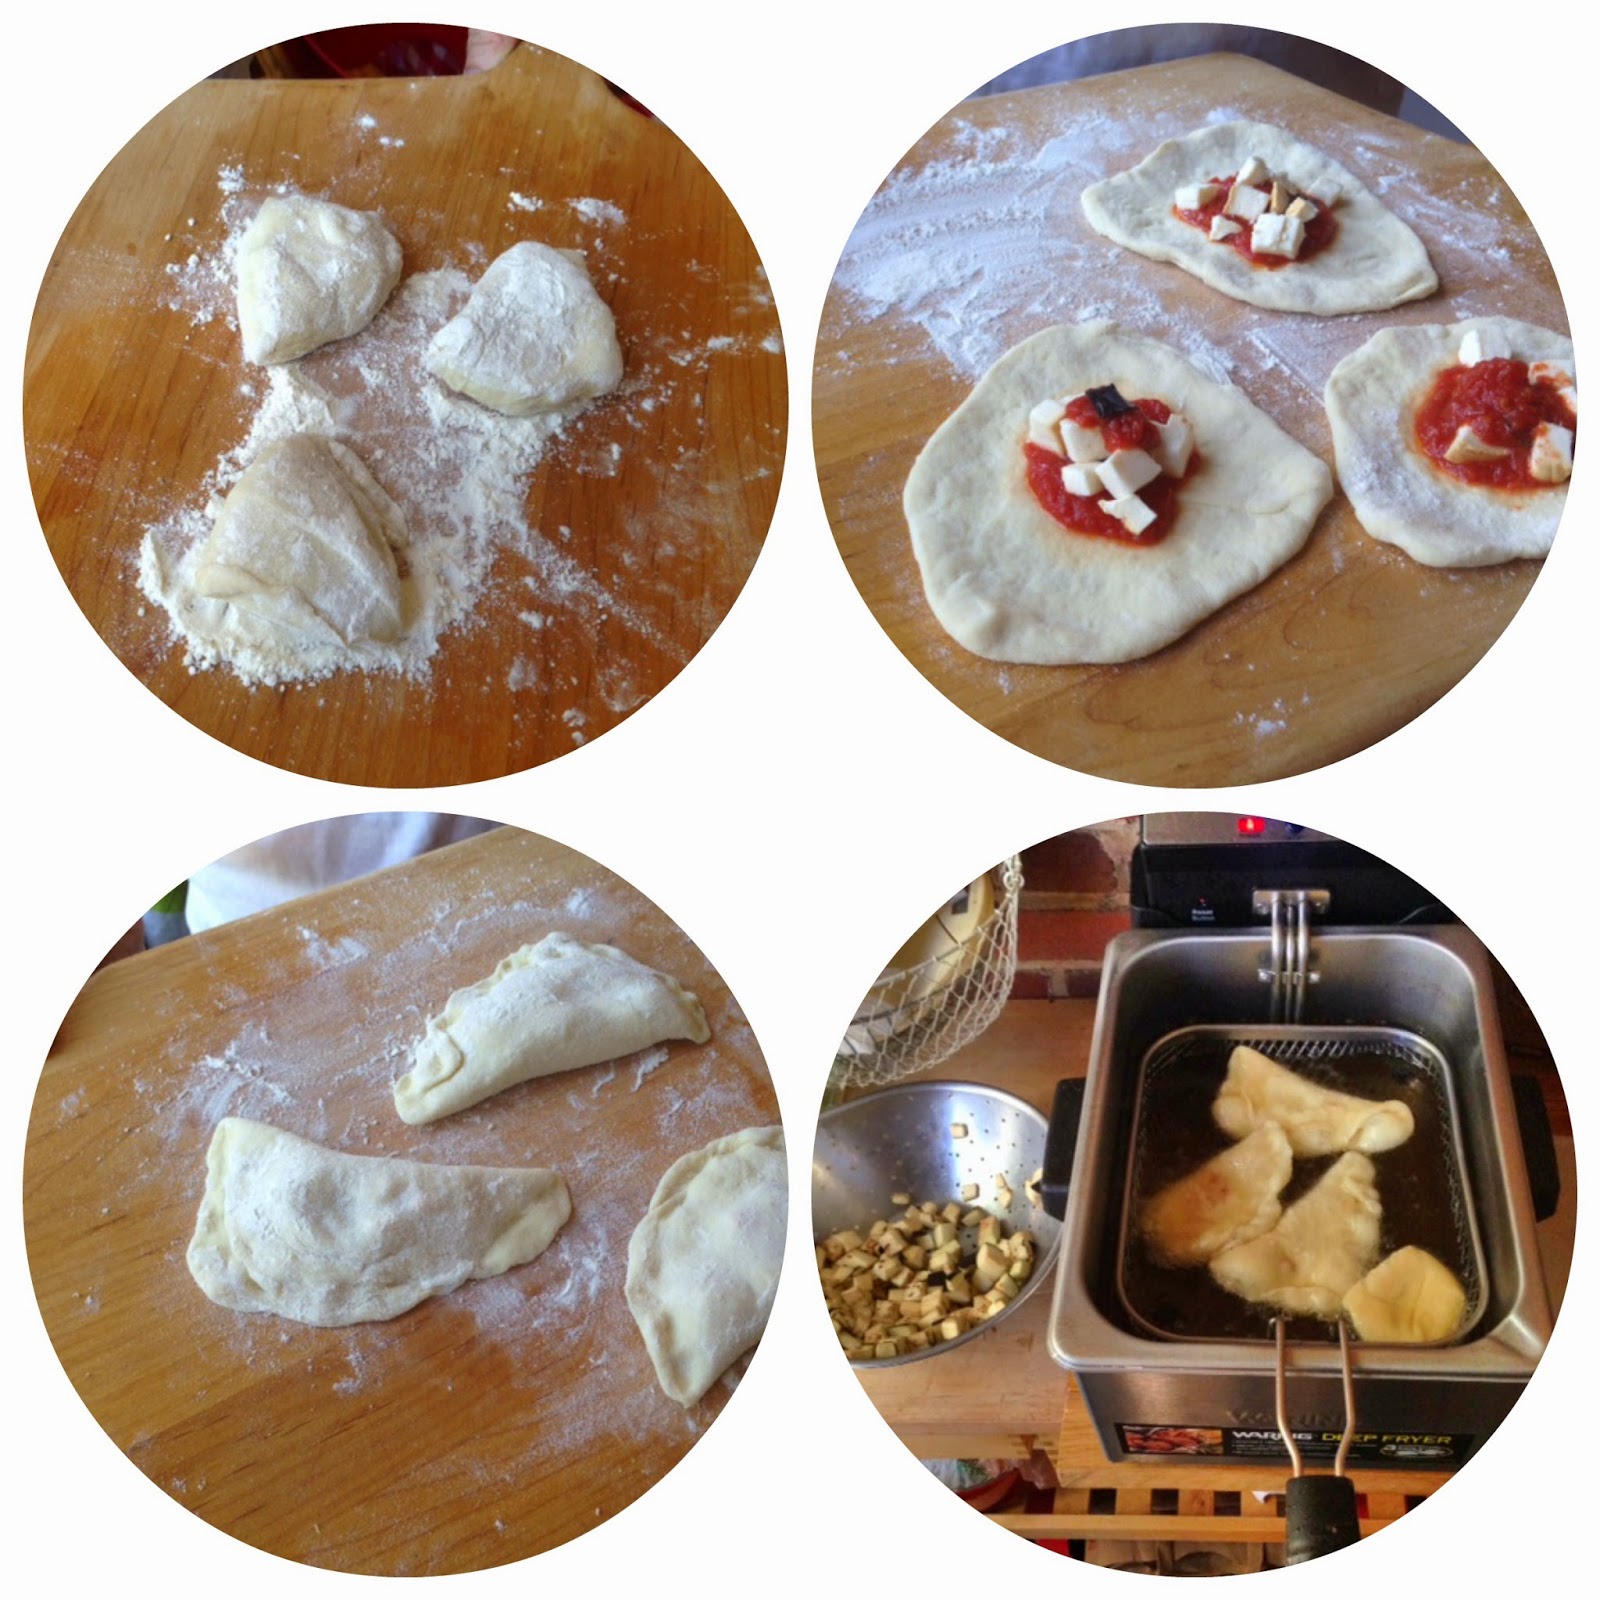
Deep-fried pizzas with mozzarella, tomatoes, and eggplants.Last week I had my birthday. If you're dying to know, I turned 38, which apparently is considered the best age, at least according to this article I found by googling "38 is the best age". To celebrate, my dear husband fulfilled my dreams (and his) by getting me a deep-fryer. Of course, we had to put it to work right away, and the first dish that sprang to mind was deep-fried pizzas.

That's right: These are mini-calzones minimally filled and deep-fried. Please note this recipe is not a culinary junk dare like these deep-fried donut bacon cheeseburgers that I don't even want to comment on. It's actually inspired by a traditional Neapolitan recipe: the pizza fritta.

Junk food in America is traditional cuisine in Italy.


The original pizza fritta was born in the poor neighborhoods of Naples after the devastation of WWII. People could not afford pizza cooked in a wood-fire oven, so they started frying it in the streets instead. The pizzas were filled with ricotta and chitterlings, or left empty. In one my favorite movies, Vittorio De Sica's "L'Oro di Napoli" (The Gold of Naples) from 1954, you can see a young and impossibly beautiful Sophia Loren as a pizza fritta vendor. The pizza fritta is not as common today in its original form, but you can still find the calzone fritto: a whole calzone filled with ricotta, mozzarella, salami, and ham and deep-fried to perfection.

How to make deep-fried pizza with mozzarella, tomato, and eggplants.


But back to my birthday. I have no illusion our deep-fried pizzas would compete with their Neapolitan inspiration, but they were super delicious: soft, chewy, salty, and not at all greasy. We filled them with mozzarella, a little bit of San Marzano tomato sauce, and fried eggplants. We didn't make the dough ourselves because, living in D.C., we are blessed with great ready dough from two delicatessens, Vace and The Italian Store. We used Vace this time, and were thrilled to try their own mozzarella, prepared in-store every day.

These pizzas are fairly easy to make, and definitely very fun for a Sunday with friends. Of course, this is if your guests don't mind the smell of fryer oil on their hair and clothes for a week. Present it as a party favor: You might get away with it.

Deep fried pizzas with mozzarella, tomatoes, and eggplants.
D.C. people: Start frying.


PIZZE FRITTE

Makes 16 little fried pizzas.

3 quarts of frying oil (or 3 inches if you are doing it in a dutch oven over stove heat)
2 pizza dough disks
2 whole mozzarellas, cubed and drained for 10 min in a colander
1 1/2 C of tomato sauce (make your own with San Marzano tomatoes)
1 large eggplant, cubed and deep-fried
fresh basil leaves
EVOO
Salt
Pepper


  • Heat the oil in your deep-fryer or dutch oven to 375 degrees.
  • Cut each dough in 8 parts on a well floured surface (flour is your friend, it helps soften the dough and make it more elastic) and then flatten each mini-dough, starting from the center (about 4'' diameter). Be careful the dough doesn't tear. Use your hands here; using a rolling pin is not advised for pizza. (It will cause it to tear more easily.)
  • On each pizza disc, place a small handful of mozzarella cubes, 1 tablespoon of tomato sauce, 1 tablespoon of fried eggplants, and a basil leaf.
  • Sprinkle with salt and pepper and a little EVOO.
  • Fold the dough over and press firmly to seal the pizzas into tiny calzones. It is important to create a good seal so the moisture from the cheese and sauce does not mix with the hot oil and splatter. 
  • Deep-fry until the pizzas are puffed-up and golden, turning once, just under 2 minutes. 
  • Serve immediately.

Note: These pizzas can be easily made vegan. Fill with tomato sauce, eggplant, olives, and everything you would like to see on pizzas with the exception of pineapples. 
Another note: Pizza fritta can also be made like this. My friend Checco makes this kind every year in Italy, and it's a celebration to remember. Just fry the open pizza dough and then spoon over tomato sauce and grated cheese.


PASTA WITH FRIED ZUCCHINI (AND THE GARLIC RULE)


I woke up this morning and was shocked to see it's October and not August. Where did late summer go? Halloween decor has been gracing the shelves of my CVS since July 5th, so perhaps I've trained my brain to screen out all references to Fall. But I know whom to blame for my confusion: My CSA is still offering zucchini and squash, so I'm still in summer mode. You'll have to scalpel away the Haflinger cork sandals from my dead, tan feet. (Sorry, this is a horrible image.)

Today I present you with a classic Sicilian recipe that my grandmother and mother prepared many times for my sister and I when we were little girls. The main ingredient is zucchini, thinly sliced and fried until golden brown and then spooned over spaghetti and topped with grated cheese. The sweet juices from the zucchini are going to give your spaghetti a nice brown color once you mix all the ingredients, which is something I remember perfectly from my childhood.

Standing in front of a frying pan for 20 minutes, carefully turning over zucchini slices is not my ideal approach to summer heat, so maybe it's really better if we make this pasta in October, when the air is nice and cool and our sunny past is just behind us.

Fried zucchini
Fried zucchini at rest.

THE GARLIC RULE

And here's the Garlic Rule you've been waiting for since reading this post's title. As you will see in the recipe below, the garlic is just crushed, added to the hot oil until golden, AND THEN DISCARDED. This is key concept in Italian cooking that people used to Italian-American cooking might not realize. Italians love garlic and use it often, but they like it mostly in moderation, as a small pungent accent. Heaps of minced garlic are NOT a thing in Italian cuisine. By frying the garlic for a minute, you basically infuse the oil with garlic flavor and perfume and you don't turn it into a branding tool to stamp the word "garlic" on your entire meal.

Eat me.

SPAGHETTI WITH FRIED ZUCCHINI

4 medium zucchini
2 garlic cloves, crushed 
1/4 C EVOO (or enough to fry the zucchini)
1 lb spaghetti
1/4 C grated pecorino or Parmigiano Reggiano
Salt
Pepper


  • Cut the zucchini in 1/4'' disks and set up a large pot with water for the spaghetti.
  • Heat the olive oil in a large frying pan.
  • Cook the garlic cloves in the hot oil for one minute, or until golden. Then discard.
  • Place the zucchini disks in one layer in the pan and fry on both sides, a few minutes per side, until golden brown. You might need to fry the zucchini in batches.
  • Remove the zucchini and place them on a plate covered with paper towels to drain the excess oil.
  • Cook the spaghetti al dente. You might want to use the technique for pasta with uncooked sauce outlined here.
  • Mix the spaghetti in a large bowl with the zucchini, the cheese, and some freshly-ground black pepper.
  • Serve immediately.

And since we're making spaghetti, let's refresh our basic pasta skills:


Thursday, May 1, 2014

SPAGHETTI SQUASH WITH RICOTTA SALATA AND BLACK OLIVES

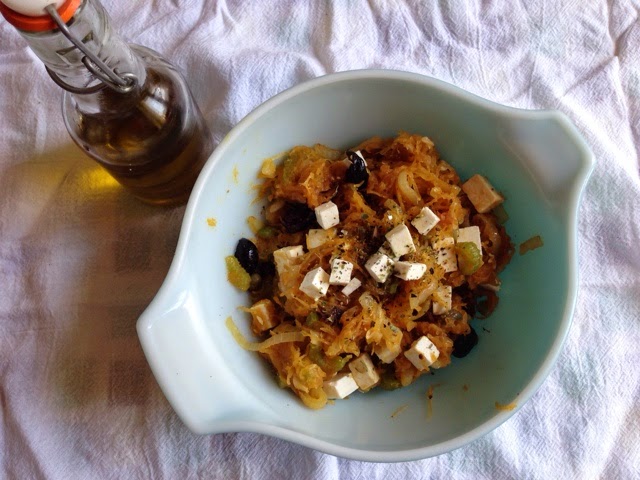
Spaghetti squash, ricotta salata, olives, capers

It's recipe time! Today I have an Italian-American combination that is not actually "Italian-American." If you're confused, I mean I have prepared a regional Italian recipe with an American ingredient, downgrading another couple of ingredients in the process. I hesitate to call it "fusion" because I'm not that desperate. But it's good enough, I believe, to avoid being labeled "a shortcut".

The original recipe is zucca with ricotta forte, which translates to "pumpkin with strong ricotta". The ricotta forte is a specialty of Bari, in the region of Puglia (Italy's high heel), and it's a pungent, spreadable cheese that is basically ricotta left to go bad for months. You can read its fascinating story in this post from Serious Eats. In the original recipe, pumpkin cubes are cooked with onions, celery, capers, anchovies, and black olives, and then mixed with a couple tablespoons of ricotta forte.

I replaced the ricotta forte with ricotta salata, which nowadays is a delicious and inexpensive staple in my pantry. Then, I replaced the pumpkin with spaghetti squash because I think it works great both for flavor and texture. Plus, I love spaghetti squash because I think it's Mother Nature giving a winking nod to Italian cuisine. *winks back*

This resulting dish is absolutely delicious and packs a lot of flavor. You can serve it as an appetizer or side, maybe spooned on toasted country bread. It also tastes great the day after, but I can't say about the day after that, because then it's usually gone. One admission: In my version you won't find the anchovies. As much as I worship my little oily friends of the sea, I've found that the squash-anchovy combination is not something my body reacts well to. If you want to try it, add two anchovies to the hot oil at the beginning of the recipe. And if you like it, you're allowed to call me a coward.

Spaghetti Squash with Ricotta Salata and Black Olives

1 small or medium spaghetti squash, roasted
2 tbsp extra-virgin olive oil
2 garlic cloves, thinly sliced 
1 tbsp capers (or more!)
1 small onion, thinly sliced
1 celery stalk, thinly sliced
2/3 cups pitted black cured olives, halved
1 cup cubed ricotta salata
dried oregano
black pepper
  • Heat the olive oil in a large pan. Add the garlic and capers. Let the capers "bloom".
  • Add the onion and celery to the pan and stir fry until the onion is golden and soft but the celery is still somewhat crispy, for 5 to 8 minutes.
  • Stir in the spaghetti squash and cook until it colors a bit, about 10 minutes. 
  • Add the black olives and cook for another 10 minutes or so, adding a few tablespoons of water if the squash mixture gets too dry.
  • Transfer the cooked mixture in a bowl and stir in the ricotta salata. Top with a drizzle of olive oil, a hefty pinch of dry oregano, and freshly ground black pepper.

Thursday, March 20, 2014

MY ITALIAN PANTRY: KIRKLAND PESTO


Pesto is one of those godsend products that can solve any meal with minimal effort. Just slap it on pasta or other grain/starch products (farro and quinoa especially), add it to a bland soup, serve it on potatoes, or mix it in a frittata, and you'll have a perfectly delicious dish that tastes fresh, luscious, and complex.

Of course, it all depends on the quality on the pesto. If you are a proud inhabitant of Liguria, where pesto is from, you can just make it fresh whenever you want, and it will taste better than any other pesto forever and ever. If you are not from Liguria but are still a better person than most, you can pound together basil, Parmigiano, pecorino, pine nuts, extra-virgin olive oil and garlic with a pestle and mortar right in time for lunch and still have time to look down your nose on the rest of the world. However, if you are anything like me, you're more than happy to buy some ready-made pesto to keep in the fridge to use when you feel lazy, but not lazy enough to eat cold leftovers from last month's brunch with friends.

"100% Imported Italian Basil D.O.P." and other ingredients. Wait...


So let me make my first product recommendation in this blog, starting with a pesto that is not painfully expensive and that tastes pretty damn Italian. I'm talking about Kirkland Basil Pesto sold at Costco in 22-oz jars for $9.40. The ingredient list is pretty good for commercial pesto, with Genovese basil, extra-virgin olive oil, Parmigiano, and pine nuts in the mix. Yes, there is sunflower oil and other strange stuff, but I have to confess that most commercial pesto in Italy uses plenty of shortcuts, replacing extra-virgin olive oil with safflower oil, pine nuts with walnuts or cashews, and adding extra weirdness such as powdered milk, margarine, palm oil, and dehydrated potatoes.

I've had a few guests from Italy in recent months, and they all loved the pesto and its price. One guest went back home with a jar, and another, daughter of a true Genovese, asked me to buy it again for the next time she'll come visit. The jar is pretty huge, so you might want to try to freeze it in cubes so you can make sure you use it all. As for my family, we go through 22 oz. quickly and without any problems. It's the overwhelmed-work-at-home mother's best friend.


Thursday, March 6, 2014

FUCK LOVE: BAKING WITH ANGER

I've had a couple of rough weeks. My preschooler is livelier than ever, the baby refuses to nap, and my PMS returned after a one and half year reprieve. My mood could best be pictured by a flock of rabid harpies flying straight out of Dante's Inferno. Luckily I remembered my motto, written in magnetic letters on my old dishwasher:


I do believe that cooking, and especially baking, has a therapeutic effect. But I'm not talking about the serene yoga-bliss advertised by slender crafters and macaroon-enthusiasts with lovely wavy locks on Pinterest (not that I'm judging). My baking therapy is an emergency intervention to save me and my family from an imminent, cataclysmic nervous breakdown. 

I'm not sure how this works, exactly, but I know that as I prep the dough, my anger dissipates. It might be that I get an outlet from the ultra speed and strength I apply to mixing the ingredients while rabidly biting on a kitchen towel. More effective than punching a wall or screaming in my nursing pillow: Baking gives my anger a worthy purpose and a crowd-pleasing result. Baking with Anger also brings an unexpected bonus. When you're angry, you tend to be less precise, often adding more of the ingredients you need. Your shaky, frenzied hands will sprinkle too much salt, chop too many olives, melt too much butter, and add way too much baking powder. (I made some furious pancakes that looked like country loaves once. They were amazing.)

A savory muffin filled with hate.

So yesterday, when I was on the brink of explosion, I decided to make muffins. Just announcing the intention of making muffins is a great start towards mental healing: Kids are immediately made happy and, more importantly, SILENT by the idea that they are soon going to have their favorite treat. 

I used this recipe for "savoury muffins" from Grab Your Spork, which calls for olives, spinach, dried tomatoes, and feta (the last thing you need in these dire times is to shove sugar-based muffins in your preschooler's mouth). I didn't have all the required ingredients, so I ended up with olive tapenade, chopped leftover kale, grated Parmigiano, and turmeric, because now I basically add it to everything. The muffins turned out great: super-flavorful, soft, and moist. My son ate 6 of them in 24 hours, which is not completely surprising since he has his parents' appetite, but still.

Notice the hand of a happy child.

Sunday, September 29, 2013

CHICKPEA BREAD (NO BREAD MACHINE)

As promised, here is a very easy and extremely rewarding recipe for chickpea bread for total bread-making newbies (like me). First of all, let me explain why I decided to make bread at home when I can easily buy it anywhere I want. I have a confession to make: We have recently become a sugar-free family. I say it with quite a bit of shame, because I really didn't want to join in this generation's most annoying quirk of eliminating one food group from its diet. Oh well.


It all started a few months ago when my husband and I decided to join 3 other million viewers and watch "Sugar: The Bitter Truth", the lecture in which UCSF endocrinologist Robert Lustig very convincingly explains why sugar, in the form of fructose, is pure evil. I soon went through my already HFCS-free pantry, and eliminated (= threw away or swallowed whole) all products containing sugar.* Of course, we realized we needed to find a type of bread without sugar. For sliced bread, we are now spending ridiculous amounts of money on Ezekiel sprouted bread, so I decided to research an easy bread recipe to bake a sugar-free loaf at home.

I started researching Italian blogs because, as far as I know, sugar isn't yet an ingredient in our everyday bread. I found this very simple recipe from ButtaLaPasta that not only does not require a bread machine, but it also allows you to use store-bought yeast rather than homemade starter yeast.** I know expert bakers will scoff at this, but I'm just learning. Just like I would not pick Lady D.'s wedding dress as my first sewing project, I will not choose a French baguette as my first bread-making experiment.

Anyway, here is the recipe. I kept the ingredients and rising times from the Italian blog, but then used the Dutch-oven baking method popularized by Mark Bittman and brilliantly explained by Patrick Lynch on his website (here). I hope you like it.

CHICKPEA BREAD


4 cups unbleached all-purpose flour
8oz cooked chickpeas (a small can will do)
1 packet active dry yeast
2 tsp salt
2 tbsp extra-virgin olive oil
lukewarm water

  • Activate the yeast in 1/4 cup lukewarm water for 15 minutes.
  • Mash the chickpeas with a fork.
  • Mix the dry ingredients and then add the wet ingredients, kneading and adding lukewarm water until the dough comes into a ball and it is a little sticky and not too hard. If you're using a stand mixer, this should take a couple of minutes.
  • Place dough into a large bowl, cover with a towel, and let it rise for 3 hours away from drafts.
  • Knead the dough again for a couple of minutes (the dough will deflate), cut a cross on top of it, and place it on oiled parchment paper and then inside a large bowl. Let the dough rise for 1 hour.
  • Forty minutes before the end of the final rise, turn on the oven to 425F and place a large Dutch oven, with cover, inside.
  • At the end of the 40 minutes, carefully place the dough inside the Dutch oven with the parchment paper. Bake for 15 minutes with the pot cover on, and then for 20-30 minutes without, until the crust is nicely browned.
  • Take bread out of the pan and let cool on a rack for about 30 minutes.

I made this bread a few times now, and I've been very happy with it. It is very quick to make, although you have to plan around rising and baking times. The result is a very soft, moist bread, and the Dutch-oven method gives it a crispy crust that I've never obtained by cooking bread in a regular oven. The chickpeas contribute a slight sweetness and add a good amount of fiber for what would otherwise be just white bread. One loaf lasts us two days, because really we are never happy with only one slice.

Let me know if you try it and if you have some suggestions. As I said before, I know nothing about bread making, so kneading times and techniques have all been improvised. 


*With the exception of a chocolate salami purchased in Venice during my latest vacation. Yes, chocolate salami. It's a chocolate dessert that looks like a salami, and it's every Italian child's favorite thing in life. See one here.
**In Italy especially, there's a very powerful cult of bakers who create and feed their baking yeast at home. They call it Mother Yeast, and that's all I have to say.